
Irresistible Artisan Rosemary and Garlic Crusty Bread Recipe
Crafting an irresistible artisan rosemary and garlic crusty bread reveals the magic of home baking.
Rustic loaves speak volumes about culinary passion and skill.
Fragrant herbs and pungent garlic dance together in this simple yet sophisticated recipe.
Kitchen counters become artistic spaces where flour, water, and love merge into golden-crusted perfection.
Salt crystals and fresh rosemary sprigs add depth to every delectable slice.
Kneading dough connects you to centuries-old baking traditions that transcend generations.
Warm, crusty bread promises comfort and joy with each heavenly bite.
Why This Rosemary Garlic Bread Smells Like Heaven
Ingredient Musts for That Bold Crusty Loaf
Base Ingredients:Flavor Enhancers:Finishing Ingredients:How to Make Artisan Bread That Impresses
Step 1: Mix Dry Ingredients
Grab a spacious mixing bowl and combine flour, salt, and instant yeast. Whisk these ingredients thoroughly to ensure they’re evenly distributed throughout the mixture.
Step 2: Create Dough Base
Pour warm water into the dry ingredients and blend until a shaggy, sticky dough emerges. Don’t worry about perfect texture – a slightly messy dough is exactly what you want.
Step 3: Infuse Herbal Flavors
Gently fold in fresh ingredients:Ensure these aromatic elements are evenly spread throughout the dough for maximum flavor impact.
Step 4: Allow Dough to Rise
Cover the bowl with plastic wrap or a clean kitchen towel.
Let the dough rest at room temperature for 12-18 hours. Watch for it to double in size and develop bubbles, signaling fermentation magic is happening.
Step 5: Prepare Baking Setup
Heat your oven to 450°F. Place a Dutch oven or heavy oven-safe pot (including its lid) inside while preheating to create a perfect baking environment.
Step 6: Shape the Loaf
Sprinkle flour on your work surface. Gently transfer the dough and shape it into a round ball.
Be careful not to overwork the delicate mixture.
Step 7: Initial Baking Phase
Carefully remove the scorching hot Dutch oven.
Transfer the dough inside, cover with the lid, and bake for 30 minutes.
Step 8: Finish with a Golden Crust
Remove the lid and continue baking for 15-20 minutes.
Look for a beautiful golden-brown exterior that promises crispy, delectable results.
Step 9: Cool and Finish
Transfer the bread to a wire rack.
For an extra touch of brilliance, brush the crust with olive oil, creating a glossy, appetizing finish that’ll make mouths water.
Tips to Nail That Savory Herb Bread Finish
Tweak Your Loaf With Flavorful New Spins
What Complements Rosemary Garlic Bread Best
How to Store Crusty Bread Without Losing Crunch
FAQs About This Flavor-Packed Herb Bread
The long fermentation develops deep, complex flavors and creates air pockets that give the bread its signature artisan texture. It also helps develop gluten structure, making the bread more flavorful and easier to digest.
Yes, but use about 1/3 of the amount since dried herbs are more concentrated. Fresh rosemary provides a brighter flavor, but dried will still add a nice herbal note to the bread.
Don’t worry! Artisan bread is meant to look rustic and imperfect. The beauty of this recipe is that slight irregularities contribute to its handmade charm and won’t affect the final taste or texture.
Print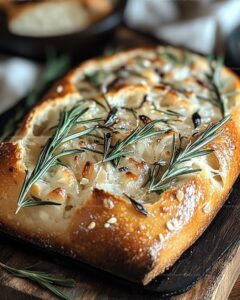
Artisan Rosemary and Garlic Crusty Bread Recipe
- Total Time: 12-18 hours and 45-50 minutes
- Yield: 8 1x
Description
Rosemary and garlic crusty bread brings rustic Italian countryside charm to kitchen counters with minimal effort. Warm, fragrant slices invite bread enthusiasts to savor each crusty, herb-infused bite alongside soups, salads, or simply spread with creamy butter.
Ingredients
Main Ingredients:
- 3 1/4 cups (400g) all-purpose flour
- 1 1/2 cups (350ml) warm water
- 2 tablespoons fresh rosemary, finely chopped
- 2 cloves garlic, minced
Seasoning and Leavening:
- 1 1/2 teaspoons salt
- 1/2 teaspoon instant yeast
Finishing Ingredient:
- 1 tablespoon olive oil (for brushing)
Instructions
- Combine dry ingredients (flour, salt, instant yeast) in a large mixing bowl, thoroughly blending to ensure even distribution of components.
- Pour warm water into the dry mixture, stirring until a rough, sticky dough emerges with a cohesive texture.
- Incorporate finely chopped rosemary and minced garlic, gently folding to create a uniform herb-infused dough.
- Shield the bowl with plastic wrap or kitchen towel, allowing the dough to ferment and expand at room temperature for 12-18 hours until significantly increased in volume and displaying bubbling surface.
- Prepare the oven by heating to 450°F (230°C) and positioning a Dutch oven or heavy lidded pot inside during preheating.
- Dust a clean work surface with flour, delicately transferring the risen dough and shaping into a gentle round without excessive manipulation.
- Transfer the dough into the scorching hot Dutch oven, covering with the lid and baking for precisely 30 minutes.
- Uncover the Dutch oven and continue baking for an additional 15-20 minutes until the exterior develops a rich, golden-brown crust with a crisp exterior.
- Extract the bread carefully, transferring to a wire cooling rack and optionally brushing the surface with olive oil for a luxurious, glossy finish.
Notes
- Swap instant yeast with active dry yeast by dissolving it in warm water first and adding a bit more rising time.
- For gluten-free version, use a blend of gluten-free flour and add xanthan gum to help bind the dough.
- Enhance flavor complexity by roasting garlic beforehand, which mellows its sharpness and adds deeper, caramelized notes.
- Prevent dense bread by ensuring water temperature is precisely lukewarm (around 110°F) to activate yeast without killing it.
- Prep Time: 12-18 hours
- Cook Time: 45-50 minutes
- Category: Snacks, Dinner
- Method: Baking
- Cuisine: Italian
Nutrition
- Serving Size: 8
- Calories: 160
- Sugar: 0.2g
- Sodium: 190mg
- Fat: 1.5g
- Saturated Fat: 0.2g
- Unsaturated Fat: 1.3g
- Trans Fat: 0g
- Carbohydrates: 32g
- Fiber: 1g
- Protein: 4g
- Cholesterol: 0mg
Mia Thompson
Pastry Chef & Content Creator
Expertise
Education
Portland Community College – Baking and Pastry Arts Program
Specialized in artisanal bread, seasonal desserts, and sustainable baking methods.
National University of Natural Medicine – Bachelor of Science in Nutrition (BScN)
Focused on “Food as Medicine” philosophy, with core threads in nutrition.
Mia’s love affair with baking began in her grandmother’s kitchen, where sneaking spoonfuls of batter first sparked her curiosity. She refined her skills through Portland Community College’s Baking and Pastry Arts Program and her expertise at the National University of Natural Medicine, earning a B.Sc. in Nutrition.
At The Scrumptious Pumpkin, Mia reimagines classics with effortless seasonal treats, healthier twists on old favorites, and playful confections that feel like pure joy. Beyond the oven, she nurtures her urban garden, forages local ingredients around Portland, and leads hands‑on nutrition workshops for her community.