The Ultimate Blooming Quesadilla Ring Recipe for Party Magic
Cheese lovers can’t resist this mouthwatering blooming quesadilla ring that transforms a classic snack into a stunning centerpiece.
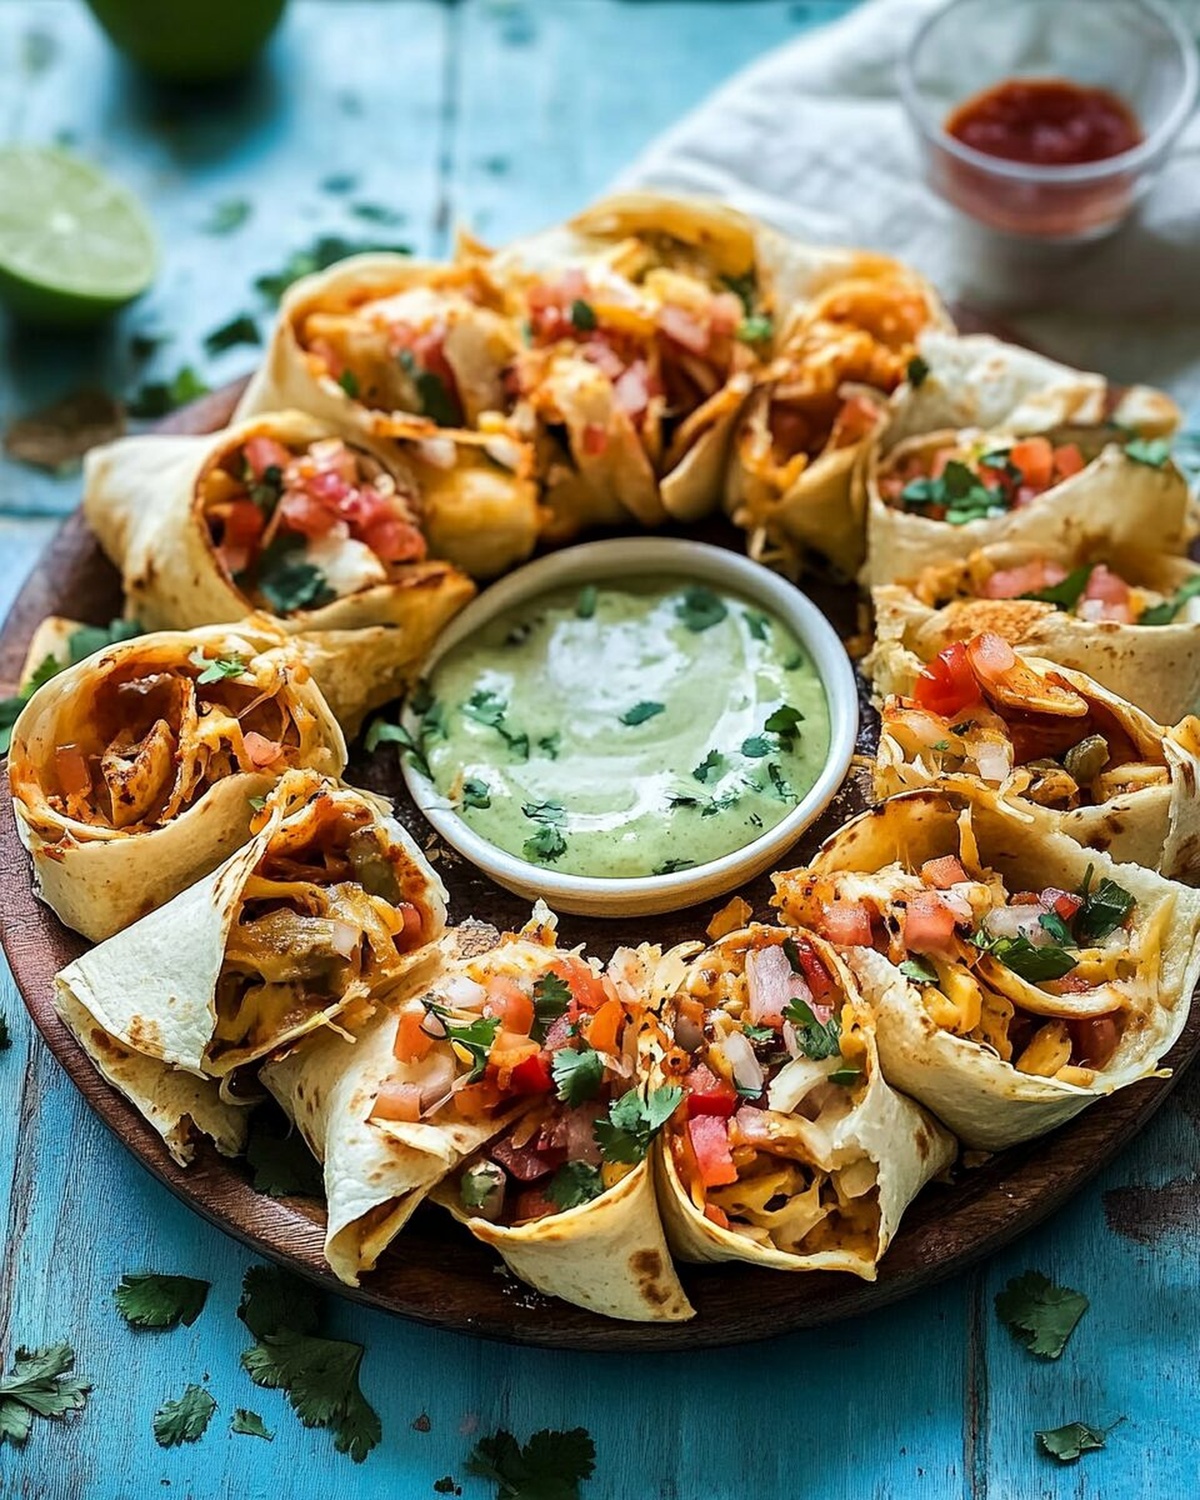
Spiraling tortillas create an impressive circular design that catches everyone’s attention.
Layers of melted cheese, seasoned meat, and vibrant toppings make this dish irresistible.
Each slice reveals a perfect blend of crispy edges and gooey interior.
Hosting a gathering becomes effortless with this show-stopping recipe that sparks conversation.
Watching people pull apart the golden, crisp segments is pure culinary joy.
You’ll want to make this crowd-pleasing creation again and again.
Why Blooming Quesadilla Ring Is A Party Showstopper
What You’ll Need For Blooming Quesadilla Ring
Main Ingredients:Vegetable Ingredients:Sauce and Seasoning:Additional Ingredients:How To Build A Blooming Quesadilla Ring With Ease
Step 1: Warm Up The Oven
Crank your oven to 375˚F and line a baking sheet with parchment paper. This sets the stage for your delicious creation.
Step 2: Create Flavor-Packed Filling
Grab a large bowl and toss together:Mix these ingredients until they’re perfectly combined.
Step 3: Shape Cheesy Tortilla Cones
Slice tortillas in half and get ready to roll.
For each half, sprinkle:Roll each tortilla from the cut edge into a cone shape, making sure the filling stays tucked inside.
Step 4: Build The Circular Masterpiece
Place a wide-mouth jar or glass in the center of your prepared baking sheet.
Arrange 13 tortilla cones around the jar, with pointed ends touching the central container.
Step 5: Layer With Melty Cheese
Sprinkle a generous layer of cheddar and Monterey Jack cheese over the first ring of cones.
Continue building two more layers, finishing with another cheese shower.
Step 6: Bake To Golden Perfection
Remove the central jar and slide the baking sheet into the oven.
Bake for 15-20 minutes until the cheese transforms into a molten blanket and tortillas turn beautifully crispy.
Step 7: Serve And Enjoy
Transfer your quesadilla ring to a stunning serving platter.
Place a bowl of your favorite dip right in the center. Serve immediately and watch everyone’s eyes light up!
Tips To Make Your Blooming Quesadilla Ring Shine
Tasty Twists For A New Quesadilla Ring Spin
What To Serve With Blooming Quesadilla Ring
Storing Blooming Quesadilla Ring The Right Way
Your Blooming Quesadilla Ring FAQs
The taco sauce provides a zesty flavor while combining chicken with onion, red bell pepper, and jalapeño creates a delicious and spicy mixture that gives depth to the quesadilla ring.
Roll the tortilla tightly from the cut edge and ensure the filling is compact inside. The cheese will also help seal the cone shape during baking.
Absolutely! You can substitute chicken with ground beef, pulled pork, or even make a vegetarian version using black beans, corn, or sautéed vegetables.
Use medium-sized soft flour tortillas. They are flexible enough to roll into cones and hold the filling without breaking during the baking process.
Print
Blooming Quesadilla Ring Recipe
- Total Time: 35-40 minutes
- Yield: 8 1x
Description
Culinary magic unfolds with this blooming quesadilla ring, a spectacular Mexican-inspired dish that twirls tortillas into a mesmerizing circular feast. Crispy edges, melted cheese, and zesty fillings create an irresistible centerpiece that will draw hungry guests closer for a delightful shared meal.
Ingredients
Main Ingredients:
- 3 cups shredded cheddar cheese
- 3 cups shredded Monterey Jack cheese
- 3 cups cooked and shredded chicken
- 20 taco-size tortillas
Vegetables:
- 1 onion, chopped
- 1 red bell pepper, chopped
- 1 jalapeño, chopped
Sauce:
- 1 cup taco sauce
Instructions
- Prepare the oven at 375˚F and line a baking sheet with parchment paper for optimal cooking surface.
- Create a flavorful filling by thoroughly blending shredded chicken, diced onion, chopped red bell pepper, minced jalapeño, and tangy taco sauce in a mixing bowl.
- Transform tortillas by slicing each into halves, then generously layer with cheddar and Monterey Jack cheeses alongside the prepared chicken mixture.
- Skillfully roll each tortilla half into a cone shape, carefully sealing the filling inside to prevent spillage during baking.
- Position a wide-mouth jar at the center of the baking sheet as a guide, then strategically arrange 13 tortilla cones around it, positioning pointed ends towards the central jar.
- Create multiple layers by sprinkling additional cheese between each ring of tortilla cones, ensuring complete coverage and maximum cheesy goodness.
- Remove the central jar and transfer the assembled quesadilla ring to the preheated oven, baking for 15-20 minutes until the tortillas turn golden and crisp, and the cheese melts completely.
- Gently transfer the finished quesadilla ring to a serving platter, placing a complementary dip in the center for an interactive and delicious presentation. Serve immediately while warm and crispy.
Notes
- Customize the heat level by adjusting jalapeño quantity or using milder peppers for sensitive palates.
- Swap chicken with black beans or shredded beef for alternative protein options that suit vegetarian or meat preferences.
- Use low-fat cheese or dairy-free alternatives to create a lighter, healthier version of this crowd-pleasing appetizer.
- Ensure tortilla cones are tightly rolled to prevent filling from falling out during baking, maintaining a neat and professional presentation.
- Prep Time: 20 minutes
- Cook Time: 15-20 minutes
- Category: Lunch, Appetizer, Snacks
- Method: Baking
- Cuisine: Mexican
Nutrition
- Serving Size: 8
- Calories: 400
- Sugar: 2 g
- Sodium: 800 mg
- Fat: 22 g
- Saturated Fat: 12 g
- Unsaturated Fat: 8 g
- Trans Fat: 0 g
- Carbohydrates: 36 g
- Fiber: 3 g
- Protein: 24 g
- Cholesterol: 75 mg
Mia Thompson
Pastry Chef & Content Creator
Expertise
Education
Portland Community College – Baking and Pastry Arts Program
Specialized in artisanal bread, seasonal desserts, and sustainable baking methods.
National University of Natural Medicine – Bachelor of Science in Nutrition (BScN)
Focused on “Food as Medicine” philosophy, with core threads in nutrition.
Mia’s love affair with baking began in her grandmother’s kitchen, where sneaking spoonfuls of batter first sparked her curiosity. She refined her skills through Portland Community College’s Baking and Pastry Arts Program and her expertise at the National University of Natural Medicine, earning a B.Sc. in Nutrition.
At The Scrumptious Pumpkin, Mia reimagines classics with effortless seasonal treats, healthier twists on old favorites, and playful confections that feel like pure joy. Beyond the oven, she nurtures her urban garden, forages local ingredients around Portland, and leads hands‑on nutrition workshops for her community.