
The Most Heavenly Chocolate Caramel Tarts Recipe Ever Made
Delectable chocolate caramel tarts dance between decadence and pure indulgence.
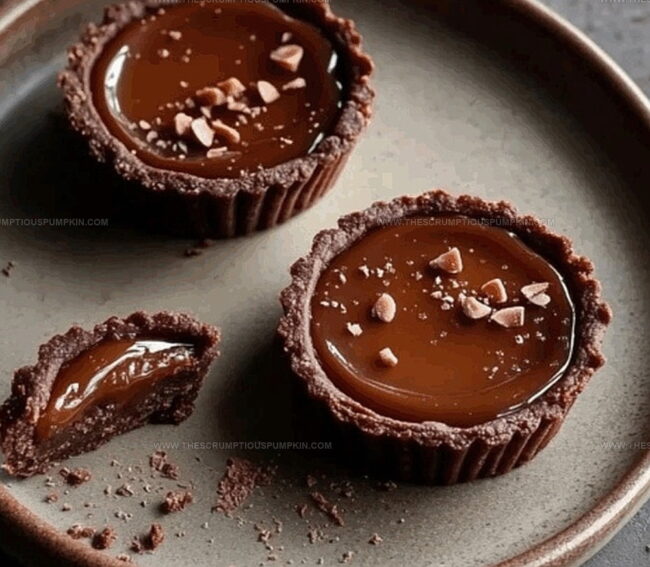
Sweet layers of rich chocolate meld perfectly with golden caramel notes.
Silky smooth textures promise an elegant dessert experience.
Each bite reveals carefully balanced flavors that surprise and delight.
Craft these stunning tarts with minimal kitchen expertise and maximum enjoyment.
Professional pastry skills aren’t required – just enthusiasm and basic baking knowledge.
You’ll impress everyone at the table with this irresistible treat that looks complicated but comes together effortlessly.
What Makes Chocolate Caramel Tarts So Tempting
What You’ll Need for Chocolate Caramel Tarts
Base Ingredients:Caramel Components:Finishing Ingredients:How to Make Chocolate Caramel Tarts Like a Pro

Step 1: Blend Chocolatey Dough Base
Combine flour, cocoa powder, and cold butter in a food processor. Pulse the ingredients until they transform into a texture resembling crumbly sand. The goal is to create a rich, dark foundation for your tarts.
Step 2: Form Dough Consistency
Add eggs to the dry mixture and pulse until the ingredients bind together into a smooth, cohesive ball. The dough should feel slightly tacky but not sticky.
Step 3: Chill Dough
Wrap the dough in plastic wrap and refrigerate for half an hour. This resting period allows the gluten to relax and the butter to firm up, ensuring a flaky crust.
Step 4: Prepare Baking Station
Heat the oven to 375°F. Roll out the chilled dough to a delicate 1/8-inch thickness on a lightly floured surface.
Step 5: Shape Tart Shells
Gently transfer the dough into individual tart molds. Press firmly into corners and trim any excess edges for a clean, professional look.
Step 6: Blind Bake Shells
Place pie weights in the tart shells and bake for 15 minutes. Remove weights and continue baking for an additional 5-7 minutes until the shells turn crisp and golden.
Step 7: Create Luxurious Caramel
In a heavy-bottomed pan, combine sugar and water. Cook without stirring until the mixture transforms into a deep, rich amber color, which takes about 8-10 minutes.
Step 8: Finish Caramel Sauce
Remove caramel from heat and carefully whisk in heavy cream. The mixture will bubble and steam, so proceed with caution. Stir in vanilla extract and salt until smooth and glossy.
Step 9: Fill Tart Shells
Pour the warm caramel into the baked chocolate shells, filling them about three-quarters full. Allow the caramel to set at room temperature for 15-20 minutes.
Step 10: Add Chocolate Drizzle
Melt dark chocolate and create an artistic drizzle over the set caramel surface.
Step 11: Optional Nutty Crunch
Sprinkle chopped nuts on top for an extra layer of texture and flavor complexity.
Step 12: Chill and Serve
Refrigerate the tarts for 30 minutes to achieve the perfect consistency. The result is a decadent dessert that balances rich chocolate, smooth caramel, and delightful crunch.
Helpful Tricks for Chocolate Caramel Tart Success
Sweet Spins on Chocolate Caramel Tarts
What to Serve with Chocolate Caramel Tarts
Storing Chocolate Caramel Tarts the Smart Way
Chocolate Caramel Tarts FAQ Roundup
Refrigerating the dough helps relax gluten, prevents shrinkage during baking, and ensures a more tender, flaky crust by allowing butter to solidify.
Use a heavy-bottomed pan, watch color carefully, and avoid stirring. The sugar should turn deep amber without becoming dark brown or black, which indicates burning.
Dark chocolate with 60-70% cocoa content provides the best balance of flavor and melting consistency for this recipe. Choose high-quality chocolate for optimal results.
Yes, you can prepare the tart shells up to 2 days ahead. Store them in an airtight container at room temperature after completely cooling to maintain their crisp texture.
Print
Chocolate Caramel Tarts Recipe
- Total Time: 1 hour 5-10 minutes
- Yield: 8 1x
Description
Rich chocolate caramel tarts deliver a luxurious dessert experience that blends silky ganache with buttery caramel. Crisp pastry shells and deep cocoa notes promise delightful indulgence for passionate bakers seeking sweet perfection.
Ingredients
Main Ingredients:
- 2 cups all-purpose flour
- 1 cup unsalted butter
- 1/2 cup cocoa powder
- 4 large eggs
Filling Ingredients:
- 1 cup granulated sugar
- 1/2 cup heavy cream
- 1/4 cup water
- 1/2 cup caramel sauce
Garnish and Flavor Enhancers:
- 1/4 tsp salt
- 1 tsp vanilla extract
- 2 oz dark chocolate
- 1/4 cup chopped nuts (optional)
Instructions
- Prepare the chocolate tart shell by combining flour, cocoa powder, and cold butter in a food processor, pulsing until the mixture resembles coarse crumbs.
- Add eggs to the dry mixture and pulse until the dough comes together, forming a cohesive ball.
- Wrap the dough in plastic and refrigerate for 30 minutes to firm up and relax the gluten.
- Preheat the oven to 375°F and roll out the chilled dough to 1/8-inch thickness.
- Carefully transfer the dough into individual tart molds, pressing firmly into corners and trimming excess edges.
- Blind bake the tart shells for 15 minutes using pie weights, then remove weights and bake an additional 5-7 minutes until crisp.
- Create caramel by heating sugar and water in a heavy-bottomed pan, cooking without stirring until it turns deep amber, approximately 8-10 minutes.
- Remove caramel from heat and slowly whisk in heavy cream, being cautious of potential splattering.
- Stir in vanilla extract and salt into the caramel mixture until smooth and glossy.
- Pour warm caramel into baked chocolate tart shells, filling them about 3/4 full.
- Allow caramel to set at room temperature for 15-20 minutes.
- Melt dark chocolate and drizzle over the set caramel surface.
- Optional: Sprinkle chopped nuts on top for added texture and flavor.
- Chill tarts for 30 minutes before serving to ensure perfect consistency.
Notes
- Chill the dough thoroughly to prevent shrinkage and maintain a crisp, flaky tart shell during baking.
- Use a digital thermometer when making caramel to avoid burning and achieve the perfect amber color consistently.
- Create gluten-free variation by substituting regular flour with almond or gluten-free flour blend, ensuring same texture and taste.
- Enhance flavor complexity by experimenting with different chocolate types like milk or white chocolate for drizzling, offering unique taste profiles.
- Prep Time: 30 minutes
- Cook Time: 35-40 minutes
- Category: Desserts, Snacks
- Method: Baking
- Cuisine: French
Nutrition
- Serving Size: 8
- Calories: 450
- Sugar: 25 g
- Sodium: 100 mg
- Fat: 30 g
- Saturated Fat: 18 g
- Unsaturated Fat: 10 g
- Trans Fat: 0 g
- Carbohydrates: 45 g
- Fiber: 2 g
- Protein: 5 g
- Cholesterol: 100 mg
Mia Thompson
Pastry Chef & Content Creator
Expertise
Education
Portland Community College – Baking and Pastry Arts Program
Specialized in artisanal bread, seasonal desserts, and sustainable baking methods.
National University of Natural Medicine – Bachelor of Science in Nutrition (BScN)
Focused on “Food as Medicine” philosophy, with core threads in nutrition.
Mia’s love affair with baking began in her grandmother’s kitchen, where sneaking spoonfuls of batter first sparked her curiosity. She refined her skills through Portland Community College’s Baking and Pastry Arts Program and her expertise at the National University of Natural Medicine, earning a B.Sc. in Nutrition.
At The Scrumptious Pumpkin, Mia reimagines classics with effortless seasonal treats, healthier twists on old favorites, and playful confections that feel like pure joy. Beyond the oven, she nurtures her urban garden, forages local ingredients around Portland, and leads hands‑on nutrition workshops for her community.