
Sizzling Copycat Texas Roadhouse Rattlesnake Bites Recipe
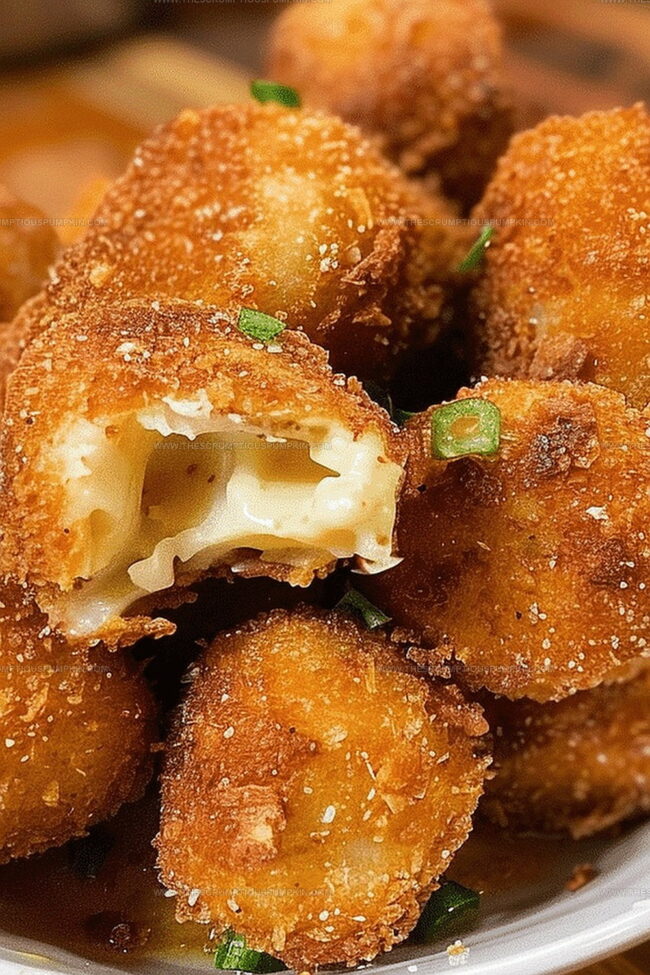
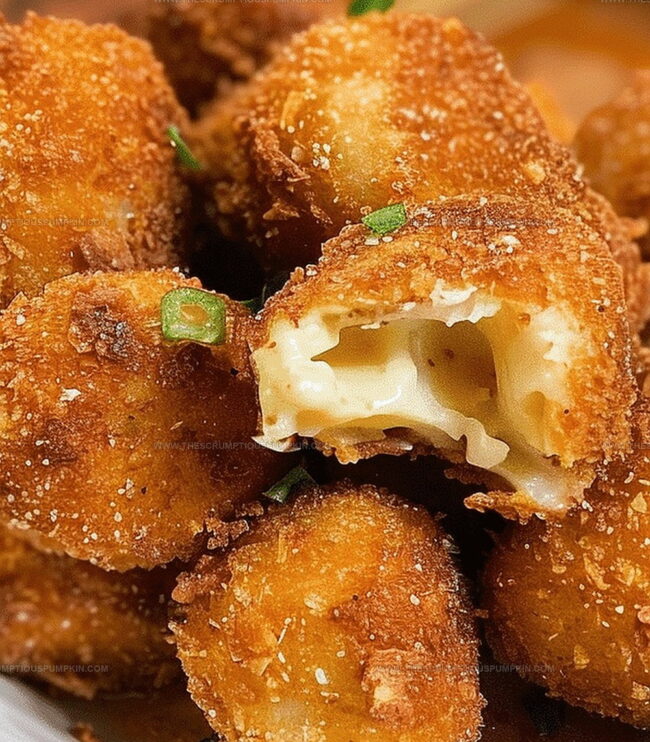
Crispy, cheesy, and surprisingly addictive, these copycat Texas Roadhouse rattlesnake bites pack a serious flavor punch that’ll make you forget all about standard appetizers.
Jalapeños dance with melted cheese inside a golden-brown crust of pure deliciousness.
Spice lovers understand the magic of this crowd-pleasing snack that feels like a party in your mouth.
Recreating restaurant favorites at home lets you control every delectable detail.
No need for fancy culinary skills or complicated techniques – just simple ingredients and a bit of kitchen enthusiasm.
When friends gather, these bite-sized treats become instant conversation starters that disappear faster than you can say “more, please!” Prepare to become the ultimate snack hero with this irresistible recipe that promises to steal the show.
Copycat Texas Roadhouse Rattlesnake Bites That Impress
Ingredients for Rattlesnake Bites
Cheese Base:Spice Blend:Coating Ingredients:How to Prepare Rattlesnake Bites

Step 1: Blend Cheesy Goodness
Create a zesty cheese mixture by combining Monterey Jack, cheddar, jalapenos, and spices in a mixing bowl.
Whisk the ingredients until they’re evenly distributed, creating a bold and flavorful base for your poppers.
Step 2: Shape and Chill
Roll the cheese mixture into bite-sized balls, each about an inch in diameter.
Arrange the balls on a baking sheet and pop them in the freezer for 15 minutes to firm up and help them hold their shape during frying.
Step 3: Prepare Frying Station
Heat oil in a deep fryer or large pot to 350°F.
While the oil warms up, set up your breading station with separate dishes for flour, beaten eggs, and breadcrumbs.
Step 4: Coat and Bread
Take each frozen cheese ball and follow the breading process:Step 5: Fry to Golden Perfection
Carefully lower the breaded cheese balls into the hot oil.
Fry in small batches for 2-3 minutes, turning occasionally to ensure even browning.
Look for a beautiful golden-brown exterior that’s crispy and inviting.
Step 6: Serve and Enjoy
Remove the poppers from the oil and drain on paper towels to remove excess oil.
Transfer to a serving plate and pair with your favorite dipping sauce for an extra flavor kick.
Serve immediately while hot and crispy.
Pro Tips for Rattlesnake Bites
Flavor Twists on Rattlesnake Bites
Serving Ideas for Rattlesnake Bites
Storage Tips for Rattlesnake Bites
FAQs
Not extremely. The jalapenos and cayenne pepper add a mild kick, but you can adjust the heat by reducing or removing the cayenne and using fewer jalapenos for a milder version.
Absolutely! While Monterey Jack and cheddar work best, you can experiment with pepper jack, mozzarella, or a blend of cheeses to create your own unique flavor profile.
No, you can use a large pot with enough oil to deep fry. Just ensure the oil temperature stays consistent around 350F for the best crispy results.
Print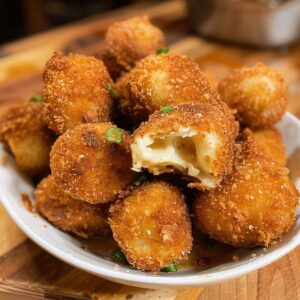
Copycat Texas Roadhouse Rattlesnake Bites Recipe
- Total Time: 23 minutes
- Yield: 4 1x
Description
Spicy jalapeño poppers called rattlesnake bites highlight crispy fried appetizers from Texas Roadhouse. Quick and easy homemade versions deliver restaurant-quality flavor that satisfies crowd-pleasing snack cravings.
Ingredients
Main Ingredients:
- 1 cup shredded monterey jack cheese
- 1 cup shredded cheddar cheese
- 2 jalapenos, finely diced
Binding Ingredients:
- 2 eggs, beaten
- 1/2 cup all-purpose flour
- 1 cup breadcrumbs
Seasoning Ingredients:
- 1/2 teaspoon (1/2 tsp) garlic powder
- 1/2 teaspoon (1/2 tsp) onion powder
- 1/2 teaspoon (1/2 tsp) paprika
- 1/2 teaspoon (1/2 tsp) cayenne pepper
- Oil for frying
Instructions
- Create a savory blend of Monterey Jack and cheddar cheeses, incorporating finely chopped jalapenos and a medley of spices including garlic powder, onion powder, paprika, and cayenne pepper.
- Carefully shape the cheese mixture into compact, uniform spheres approximately one inch in diameter.
- Chill the cheese orbs in the freezer for 15 minutes to help maintain their structural integrity during frying.
- Heat cooking oil to 350°F in a deep fryer or large, heavy-bottomed pot, ensuring proper temperature for optimal frying.
- Prepare a breading station by coating each chilled cheese ball first in a light dusting of flour, then dipping thoroughly in beaten eggs.
- Roll the egg-coated spheres generously in breadcrumbs, ensuring complete and even coverage for a crispy exterior.
- Carefully lower the breaded cheese balls into the hot oil, frying in small batches to prevent overcrowding and maintain consistent temperature.
- Cook for 2-3 minutes, rotating occasionally, until the exterior transforms into a golden-brown, crispy shell.
- Remove the rattlesnake bites using a slotted spoon, allowing excess oil to drain on absorbent paper towels.
- Serve immediately while piping hot, accompanied by a complementary dipping sauce of your choice for an extra flavor dimension.
Notes
- Chill the cheese mixture thoroughly before forming balls to prevent crumbling and ensure better shape retention during frying.
- Use freshly grated cheese instead of pre-shredded for smoother melting and more authentic texture.
- Adjust spice levels by reducing or increasing cayenne pepper and jalapeno amounts to suit different heat tolerances.
- For a gluten-free version, swap wheat flour and breadcrumbs with gluten-free alternatives like almond flour or gluten-free panko.
- Prep Time: 20 minutes
- Cook Time: 3 minutes
- Category: Appetizer, Snacks
- Method: Frying
- Cuisine: American
Nutrition
- Serving Size: 4
- Calories: 369 kcal
- Sugar: 1 g
- Sodium: 670 mg
- Fat: 22 g
- Saturated Fat: 10 g
- Unsaturated Fat: 8 g
- Trans Fat: 0.2 g
- Carbohydrates: 23 g
- Fiber: 1 g
- Protein: 19 g
- Cholesterol: 110 mg
Lucas Bennett
Founder & Recipe Developer
Expertise
Education
Blue Ridge Community College – Certificate in Culinary Arts
Focused on seasonal cooking, sustainable kitchen practices, and farm-to-table techniques.
Appalachian State University – B.A. in English
Built critical thinking and analysis through diverse texts. Guided by faculty, it prepares graduates for publishing and more.
Growing up in the rolling hills of North Carolina, Lucas learned early that some of life’s best memories start around a kitchen table. After studying English at Appalachian State University and honing his culinary skills at Blue Ridge Community College, he dreamed of blending storytelling with rustic, seasonal cooking, and The Scrumptious Pumpkin was born.
Lucas focuses on easy, single-serving recipes that turn fresh, local ingredients into something special. His style is simple, heartfelt, and rooted in the beauty of the seasons. When he’s not testing a new dish, you’ll probably find him hiking in the Blue Ridge Mountains, browsing farmers’ markets, or scribbling food stories in a notebook.