
Crispy Golden Chicken Katsu Recipe: A Delicious Japanese Classic
Culinary adventures sometimes lead you to a golden crunch chicken katsu that perfectly balances crispy textures with tender meat.
Japanese cuisine offers incredible comfort through this classic dish.
Succulent chicken breasts get coated in a light, delicate panko breading that promises irresistible crispiness.
Home cooks can easily master this restaurant-quality meal with simple ingredients and straightforward techniques.
Crisp golden layers promise a delightful eating experience that feels both familiar and exciting.
Lean into the magic of perfectly fried chicken with this crowd-pleasing recipe that brings restaurant flavors directly to your kitchen.
Prepare to savor every delectable, crunchy bite of this irresistible meal.
Why Golden Crunch Chicken Katsu Delight Brings The Crunch
Get Everything Ready For Golden Crunch Chicken Katsu Delight
Main Ingredients:Breading Station Ingredients:Seasoning and Cooking Ingredients:Garnish and Sauce Ingredients:Fry It Up: Golden Crunch Chicken Katsu Delight Guide
Step 1: Prepare the Chicken
Grab your chicken breasts and place them between plastic wrap. Use a meat mallet or rolling pin to gently pound them until they’re evenly thin.
Sprinkle both sides with a pinch of salt and pepper to enhance the flavor.
Step 2: Create a Breading Setup
Grab three shallow bowls.
In the first bowl, spread out flour. In the second, whisk eggs until smooth.
In the third, pour panko breadcrumbs. This will be your breading station.
Step 3: Coat the Chicken
Take each chicken breast and follow this coating sequence:Step 4: Heat the Cooking Oil
Pour vegetable oil into a large skillet, creating a layer about half an inch deep. Turn the heat to medium-high.
To check if the oil is ready, drop a breadcrumb in—it should immediately sizzle and dance.
Step 5: Fry to Golden Perfection
Carefully place the breaded chicken into the hot oil.
Cook for 4-5 minutes on each side until the exterior turns a beautiful golden brown and the inside is fully cooked.
Step 6: Drain and Rest
Transfer the fried chicken to a plate lined with paper towels.
This helps absorb any extra oil, keeping the chicken crispy.
Step 7: Plate and Garnish
Slice the chicken into strips.
Serve over fluffy white rice with a side of shredded cabbage. Drizzle tonkatsu sauce generously and sprinkle sesame seeds on top for an extra touch of deliciousness.
Katsu Cooking Tips For That Perfect Crunch
Bold Twists For Chicken Katsu Delight
Sides That Match Golden Crunch Chicken Katsu Delight
Store Golden Crunch Chicken Katsu Delight With Confidence
Quick Answers For Golden Crunch Chicken Katsu Delight
The secret is using panko breadcrumbs and ensuring the oil is at the right temperature before frying. The breadcrumbs create a light, airy coating that turns beautifully golden and crisp.
Yes, chicken thighs work well for this recipe. They tend to be more flavorful and juicy, though you’ll need to adjust cooking time slightly due to their thickness.
Use a meat thermometer to check that the internal temperature reaches 165°F (74°C). The chicken should be golden brown on the outside and white throughout with no pink meat.
Print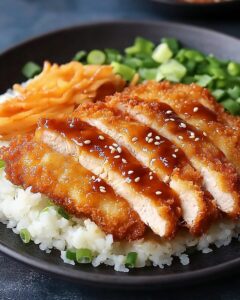
Golden Crunch Chicken Katsu Delight Recipe
- Total Time: 25 minutes
- Yield: 2 1x
Description
Succulent chicken katsu brings Japanese culinary magic straight to your kitchen with its crispy golden coating. Rich panko breadcrumbs and perfectly seasoned meat create a mouthwatering experience you’ll crave again and again.
Ingredients
Main Protein:
- 2 boneless, skinless chicken breasts
Coating Ingredients:
- 1/2 cup (120 milliliters / 4 fluid ounces) all-purpose flour
- 2 eggs, beaten
- 1 cup (240 milliliters / 8 fluid ounces) panko breadcrumbs
- 1 tablespoon (15 milliliters) sesame seeds
Accompaniments and Seasoning:
- Salt, to taste
- Pepper, to taste
- 2 cups (480 milliliters / 16 fluid ounces) cooked white rice
- 1 cup (240 milliliters / 8 fluid ounces) shredded cabbage
- 1/4 cup (60 milliliters / 2 fluid ounces) tonkatsu sauce
- Vegetable oil, for frying
Instructions
- Prepare chicken breasts by sandwiching them between plastic wrap and gently tenderizing to create uniform thickness, ensuring even seasoning with salt and pepper.
- Arrange three separate shallow dishes: one with flour, another with whisked eggs, and the third filled with panko breadcrumbs for efficient coating process.
- Carefully dredge each chicken piece through the flour, removing excess, then immerse in egg mixture, and finally roll thoroughly in panko, pressing crumbs to create a consistent crispy exterior.
- Select a large skillet and pour vegetable oil to approximately half-inch depth, heating over medium-high temperature until a test breadcrumb instantly sizzles upon contact.
- Carefully lower breaded chicken into hot oil, allowing each side to transform into a rich golden-brown color, approximately 4-5 minutes per side, ensuring complete internal cooking.
- Remove chicken from oil and place on paper towel-lined surface to absorb excess oil and maintain crispy texture.
- Slice chicken into elegant strips and arrange atop fluffy white rice accompanied by fresh shredded cabbage.
- Enhance the dish by generously drizzling traditional tonkatsu sauce and sprinkling toasted sesame seeds for additional flavor complexity and visual appeal.
Notes
- Check chicken thickness carefully to ensure even cooking and crispy exterior throughout.
- Use fresh panko breadcrumbs for maximum crunchiness and lighter texture compared to traditional breadcrumbs.
- Maintain oil temperature around 350°F to prevent greasy chicken and achieve perfect golden-brown coating.
- Customize the dish by swapping traditional tonkatsu sauce with spicy sriracha mayo or lighter yogurt-based dressing for healthier variations.
- Prep Time: 15 minutes
- Cook Time: 10 minutes
- Category: Dinner, Appetizer, Snacks
- Method: Frying
- Cuisine: Japanese
Nutrition
- Serving Size: 2
- Calories: 600
- Sugar: 5g
- Sodium: 800mg
- Fat: 30g
- Saturated Fat: 4g
- Unsaturated Fat: 20g
- Trans Fat: 0g
- Carbohydrates: 60g
- Fiber: 2g
- Protein: 35g
- Cholesterol: 200mg
Mia Thompson
Pastry Chef & Content Creator
Expertise
Education
Portland Community College – Baking and Pastry Arts Program
Specialized in artisanal bread, seasonal desserts, and sustainable baking methods.
National University of Natural Medicine – Bachelor of Science in Nutrition (BScN)
Focused on “Food as Medicine” philosophy, with core threads in nutrition.
Mia’s love affair with baking began in her grandmother’s kitchen, where sneaking spoonfuls of batter first sparked her curiosity. She refined her skills through Portland Community College’s Baking and Pastry Arts Program and her expertise at the National University of Natural Medicine, earning a B.Sc. in Nutrition.
At The Scrumptious Pumpkin, Mia reimagines classics with effortless seasonal treats, healthier twists on old favorites, and playful confections that feel like pure joy. Beyond the oven, she nurtures her urban garden, forages local ingredients around Portland, and leads hands‑on nutrition workshops for her community.