
The Spookiest Mummy Oreo Balls Recipe for Halloween Fun
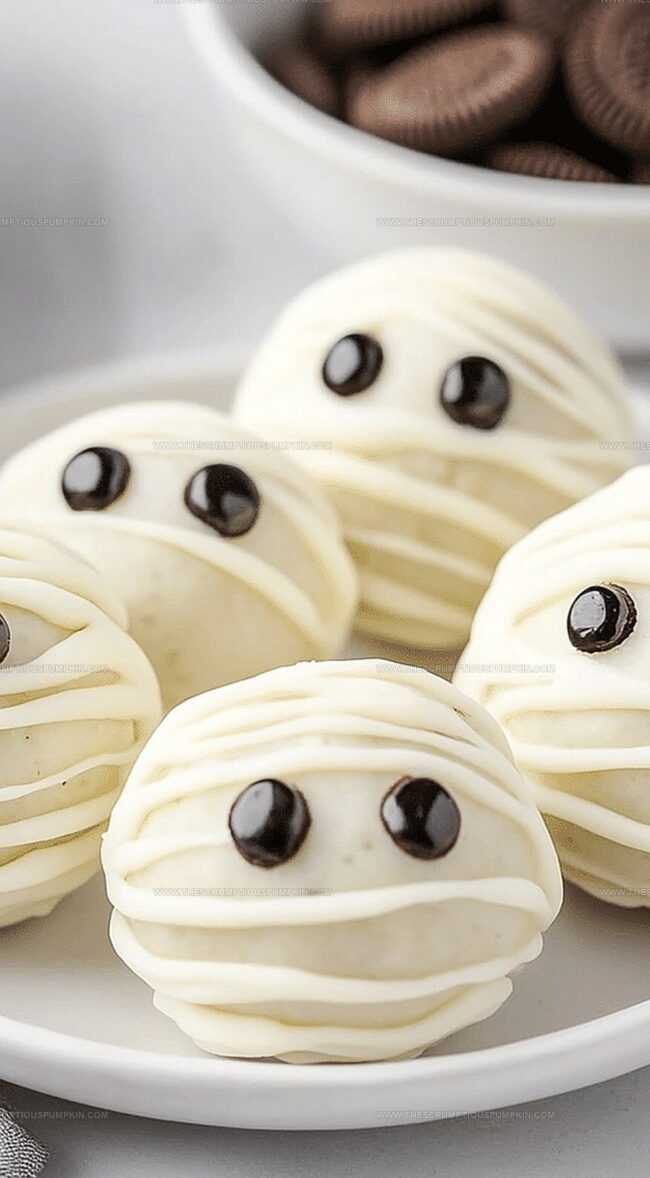
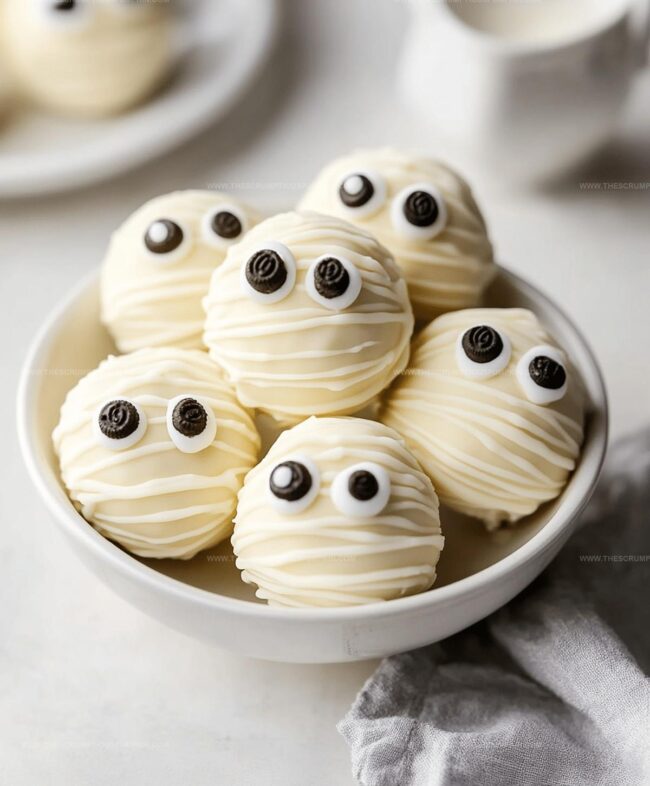
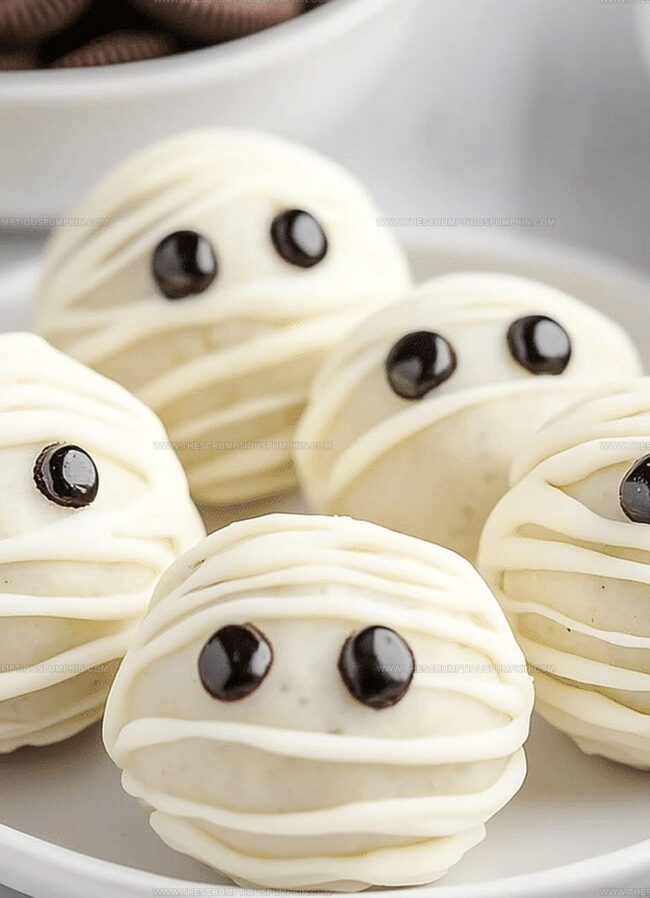
These delectable mummy oreo balls capture the spooky spirit of halloween with their adorable ghostly appearance.
Creamy chocolate and crushed cookies blend into a smooth, irresistible mixture that melts in you mouth.
Sweet decorations transform ordinary treats into playful creatures perfect for festive gatherings.
Crisp white chocolate drizzles create delicate bandage-like patterns across each round dessert.
Kids absolutely love helping craft these cute confections, making them an interactive kitchen adventure.
Soft and rich, these bite-sized delights promise to charm guests with their whimsical design.
You won’t be able to resist these adorable mummy-inspired sweets that are as fun to make as they are to devour.
Why Mummy Oreo Balls Are Halloween Hits
Mummy Oreo Balls Ingredients
Base Ingredients:Coating Ingredients:Preparation Ingredients:How to Make Mummy Oreo Balls
Step 1: Pulverize Oreo Cookies
Toss Oreo cookies into a food processor and blitz until they transform into fine, sandy crumbs that look like delicious dark snow.
Step 2: Create Creamy Dough
Blend in softened cream cheese, mixing until the mixture becomes a smooth, moldable dough that sticks together perfectly.
Step 3: Shape Ghostly Spheres
Roll the mixture into bite-sized balls using your hands, placing each one carefully on a parchment-lined baking sheet.
Step 4: Chill and Firm
Pop the baking sheet into the freezer for about 20 minutes, allowing the balls to become firm and easy to handle.
Step 5: Prepare Mummy Coating
Gently melt white chocolate or candy melts using a double boiler or microwave, stirring until silky and smooth.
Step 6: Dunk and Cover
Carefully dip each frozen Oreo ball into the melted white chocolate, ensuring complete and even coverage.
Step 7: Return to Resting Place
Place the chocolate-coated balls back onto the parchment paper, giving them space to set.
Step 8: Create Mummy Bandages
Use a fork or piping bag to drizzle additional white chocolate across the balls, creating spooky mummy-like wrapping patterns.
Step 9: Add Spooky Eyes
While the chocolate is still wet, place candy eyes on each ball to give them a playful, haunting look.
Step 10: Final Chill
Refrigerate the mummy Oreo balls for about 15 minutes until the chocolate sets completely, then serve and enjoy your creepy-cute treat!
Pro Tips for Mummy Oreo Balls
Variations of Mummy Oreo Balls
Serving Mummy Oreo Balls
Storing Mummy Oreo Balls
FAQs
Chill the balls thoroughly in the freezer for 20-30 minutes before dipping. This helps them stay firm and makes coating easier.
Yes, dark or milk chocolate works great. Just ensure it’s melted smoothly and at the right temperature for easy coating.
When stored in an airtight container in the refrigerator, Oreo balls can last up to 1 week. For best taste and texture, consume within 5-7 days.
Look for small, pre-made candy eyes in baking supply stores or craft stores. They’re inexpensive and create a cute, playful mummy look.
Print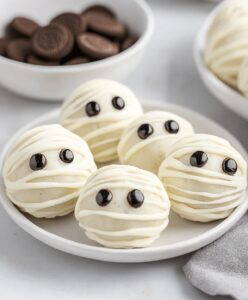
Mummy Oreo Balls Recipe
- Total Time: 15 minutes
- Yield: 18 1x
Description
Spooky Halloween Mummy Oreo Balls bring delightful terror to dessert tables with their creepy-cute appearance. Chocolate-coated cookie treats wrapped in white chocolate drizzles will enchant guests and make party platters irresistibly ghoulish.
Ingredients
Main Ingredients:
- 36 Oreo cookies (regular or chocolate)
- 8 ounces (226 grams) cream cheese, softened
Coating Ingredients:
- 12 ounces (340 grams) white chocolate or white candy melts
Decorative Ingredients:
- Candy eyes
Instructions
- Pulverize Oreo cookies to a fine powder using a food processor, ensuring no large chunks remain.
- Incorporate softened cream cheese into the cookie crumbs, mixing thoroughly until a cohesive dough forms.
- Shape the mixture into uniform 1-inch spheres, carefully positioning them on a parchment-lined baking sheet.
- Chill the oreo balls in the freezer for approximately 20 minutes to solidify their structure.
- Gently melt white chocolate or candy melts following the manufacturer’s recommended method, typically using a double boiler or microwave at 50% power.
- Carefully submerge each chilled oreo ball into the melted white chocolate, ensuring complete and even coverage.
- Return the chocolate-coated balls to the parchment-lined sheet, maintaining adequate spacing.
- Create distinctive mummy-like bandage patterns by drizzling additional melted white chocolate using a fork or piping tool with precision.
- While the chocolate remains tacky, delicately place candy eyes on each ball to simulate a playful mummy appearance.
- Refrigerate the decorated oreo balls for approximately 15 minutes to allow the chocolate to set completely and achieve optimal texture.
Notes
- Chill the cream cheese before mixing to ensure smoother blending with Oreo crumbs and prevent cracking.
- Use a cookie scoop for uniform ball sizes, creating a more professional and consistent look.
- Opt for gluten-free Oreos and dairy-free cream cheese to make the recipe suitable for different dietary needs.
- Keep the Oreo balls cold while dipping in chocolate to prevent them from falling apart and maintain their shape during coating.
- Prep Time: 15 minutes
- Cook Time: 0 minutes
- Category: Snacks, Desserts
- Method: Freezing
- Cuisine: American
Nutrition
- Serving Size: 18
- Calories: 154
- Sugar: 13 g
- Sodium: 70 mg
- Fat: 9 g
- Saturated Fat: 5 g
- Unsaturated Fat: 3 g
- Trans Fat: 0.1 g
- Carbohydrates: 18 g
- Fiber: 0.5 g
- Protein: 1.5 g
- Cholesterol: 10 mg
Lucas Bennett
Founder & Recipe Developer
Expertise
Education
Blue Ridge Community College – Certificate in Culinary Arts
Focused on seasonal cooking, sustainable kitchen practices, and farm-to-table techniques.
Appalachian State University – B.A. in English
Built critical thinking and analysis through diverse texts. Guided by faculty, it prepares graduates for publishing and more.
Growing up in the rolling hills of North Carolina, Lucas learned early that some of life’s best memories start around a kitchen table. After studying English at Appalachian State University and honing his culinary skills at Blue Ridge Community College, he dreamed of blending storytelling with rustic, seasonal cooking, and The Scrumptious Pumpkin was born.
Lucas focuses on easy, single-serving recipes that turn fresh, local ingredients into something special. His style is simple, heartfelt, and rooted in the beauty of the seasons. When he’s not testing a new dish, you’ll probably find him hiking in the Blue Ridge Mountains, browsing farmers’ markets, or scribbling food stories in a notebook.