
Whip Up Sweet No-Bake Chocolate Peanut Butter Easter Nests Recipe
Crafting delightful no-bake chocolate peanut butter easter nests promises a sweet adventure for everyone craving a simple treat.
Chocolate and peanut butter create magic when combined in these adorable springtime desserts.
Kids adore helping assemble these cute little clusters that sparkle with festive charm.
Crunchy chow mein noodles provide unexpected texture against smooth melted chocolate coating.
Minimal ingredients mean you can whip up these delectable nests in mere minutes.
Pastel candy eggs nestled on top add whimsical color and playful decoration.
These irresistible treats will make your Easter celebration extra special and deliciously memorable.
Why No-Bake Chocolate Peanut Butter Easter Nests Are So Fun
What You’ll Need For Peanut Butter Easter Nests
Base Ingredients:Coating and Preparation Ingredients:Decorative Topping:Easy Steps For No-Bake Chocolate Easter Nests
Step 1: Melt Chocolate Smoothly
Place chocolate chips in a microwave-safe bowl. Heat in 30-second intervals on low power, stirring between each interval until chocolate transforms into a silky, glossy liquid.
Step 2: Blend Peanut Butter
Quickly stir peanut butter into the melted chocolate, creating a rich, creamy mixture that combines seamlessly.
Step 3: Coat Crispy Cereal
Add Rice Krispies to the chocolate-peanut butter mixture:Gently fold until every single cereal piece is completely covered in the decadent blend.
Step 4: Prepare Muffin Tin
Grease a 12-cup muffin tin using butter or cooking spray, ensuring each cup is well-coated to prevent sticking.
Step 5: Shape Easter Nests
Distribute the chocolatey mixture evenly across the muffin tin.
Use a round measuring spoon to create a gentle indentation in the center of each nest, forming a cozy space for eggs.
Step 6: Chill and Set
Place the muffin tin in the refrigerator or freezer.
Allow the nests to firm up and solidify, transforming from gooey to perfectly structured.
Step 7: Decorate with Eggs
Once the nests are completely set, carefully remove them from the tin.
Nestle three Cadbury Mini Eggs in the center of each chocolate nest.
Step 8: Serve and Enjoy
Present these adorable Easter treats and watch everyone’s eyes light up with delight!
Top Tips For Chocolate Peanut Butter Easter Nests
Yummy Spins On Easter Nests With Chocolate And PB
Perfect Pairings For No-Bake Easter Nests
How To Store Easter Nests With Chocolate And Peanut Butter
Your Questions On Easter Nests Answered
You’ll need chocolate chips, peanut butter, Rice Krispies cereal, and Cadbury Mini Eggs as the primary ingredients.
Yes, you can use almond butter or sunflower seed butter if you have nut allergies or prefer a different flavor.
Generously grease the muffin tin with butter or cooking spray before adding the chocolate mixture to ensure easy removal.
Absolutely! Kids can help mix ingredients and place the Mini Eggs, but an adult should handle the melting chocolate step for safety.
Print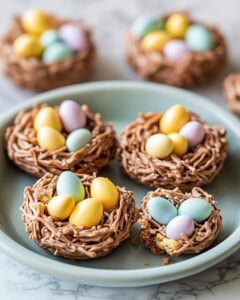
No-Bake Chocolate Peanut Butter Easter Nests Recipe
- Total Time: 15 minutes
- Yield: 8 1x
Description
Delightful no-bake chocolate peanut butter Easter nests blend sweet nostalgia with playful spring charm. Crispy chow mein noodles and chocolate create mini baskets perfect for celebrating seasonal joy with family and friends.
Ingredients
Main Ingredients:
- 3 cups cocoa Rice Krispies
- 1 cup peanut butter (creamy)
- 1 cup milk chocolate chips
Garnish:
- 36 Cadbury Mini Eggs
Instructions
- Carefully melt chocolate chips in a microwave-safe bowl, using 30-second intervals on low power and stirring between each interval until completely smooth and liquefied.
- Incorporate peanut butter into the melted chocolate, stirring until the mixture becomes uniform and glossy.
- Transfer Rice Krispies into the chocolate-peanut butter mixture, gently folding until every cereal piece is thoroughly coated with the rich, creamy blend.
- Prepare a 12-cup muffin tin by lightly greasing each cavity with butter or cooking spray to prevent sticking.
- Distribute the chocolate-coated cereal mixture evenly across the muffin tin, pressing gently to ensure each cup is filled and compact.
- Create a subtle indentation in the center of each nest using a round measuring spoon, forming a small hollow for egg placement.
- Chill the muffin tin in the refrigerator or freezer for approximately 10 minutes, allowing the nests to solidify and maintain their shape.
- After setting, carefully remove the nests from the tin and strategically place three Cadbury Mini Eggs in the center of each chocolate nest.
- Serve and relish these delightful, festive Easter treats that combine chocolatey richness with playful presentation.
Notes
- Customize chocolate type by using dark, milk, or white chocolate for varied flavor profiles.
- Swap peanut butter with almond or sunflower seed butter for nut-free dietary needs.
- Use gluten-free rice cereal to make the recipe completely gluten-free and accessible for sensitive diets.
- Cool chocolate mixture slightly before adding cereal to prevent soggy texture and maintain crisp crunch.
- Prep Time: 5 minutes
- Cook Time: 0 minutes
- Category: Desserts, Snacks
- Method: No-Bake
- Cuisine: American
Nutrition
- Serving Size: 8
- Calories: 230
- Sugar: 12 g
- Sodium: 150 mg
- Fat: 12 g
- Saturated Fat: 4 g
- Unsaturated Fat: 8 g
- Trans Fat: 0 g
- Carbohydrates: 27 g
- Fiber: 1 g
- Protein: 6 g
- Cholesterol: 0 mg
Mia Thompson
Pastry Chef & Content Creator
Expertise
Education
Portland Community College – Baking and Pastry Arts Program
Specialized in artisanal bread, seasonal desserts, and sustainable baking methods.
National University of Natural Medicine – Bachelor of Science in Nutrition (BScN)
Focused on “Food as Medicine” philosophy, with core threads in nutrition.
Mia’s love affair with baking began in her grandmother’s kitchen, where sneaking spoonfuls of batter first sparked her curiosity. She refined her skills through Portland Community College’s Baking and Pastry Arts Program and her expertise at the National University of Natural Medicine, earning a B.Sc. in Nutrition.
At The Scrumptious Pumpkin, Mia reimagines classics with effortless seasonal treats, healthier twists on old favorites, and playful confections that feel like pure joy. Beyond the oven, she nurtures her urban garden, forages local ingredients around Portland, and leads hands‑on nutrition workshops for her community.