
The Ultimate Cheesy Taco Sticks Recipe for Crispy Family Fun
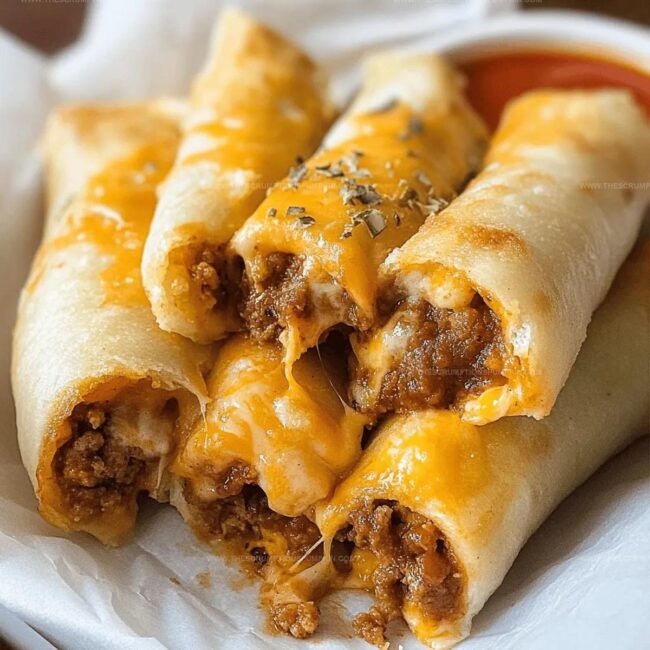
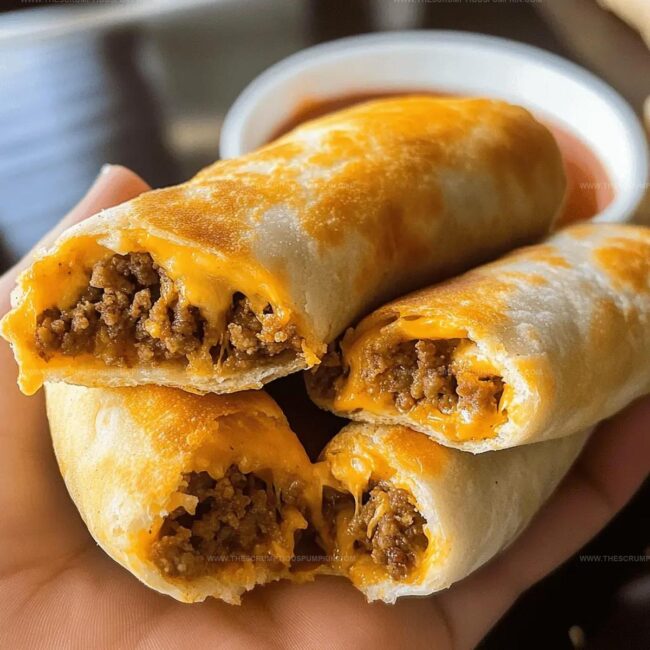
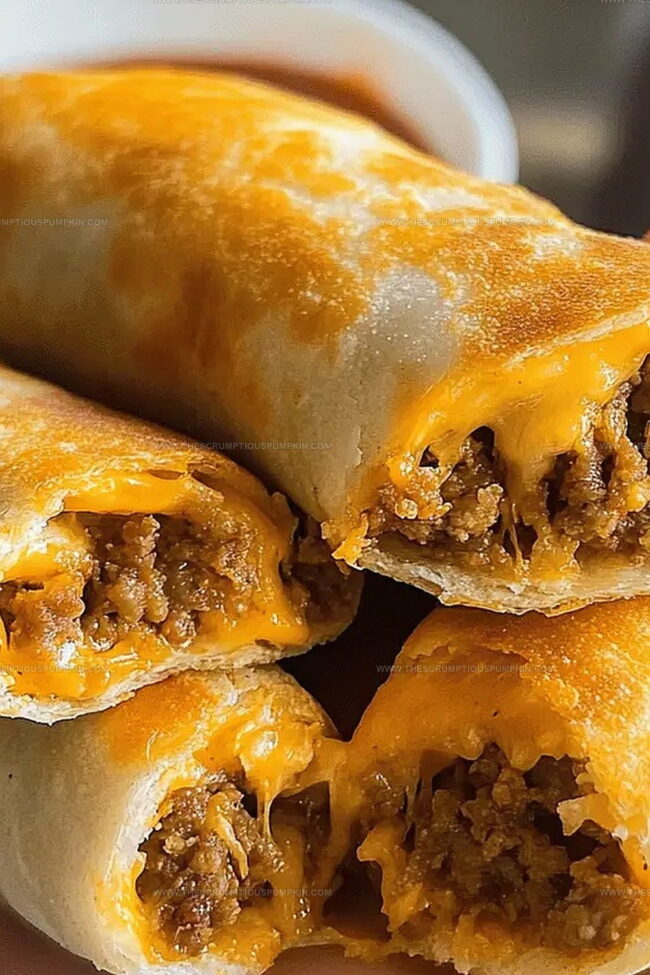
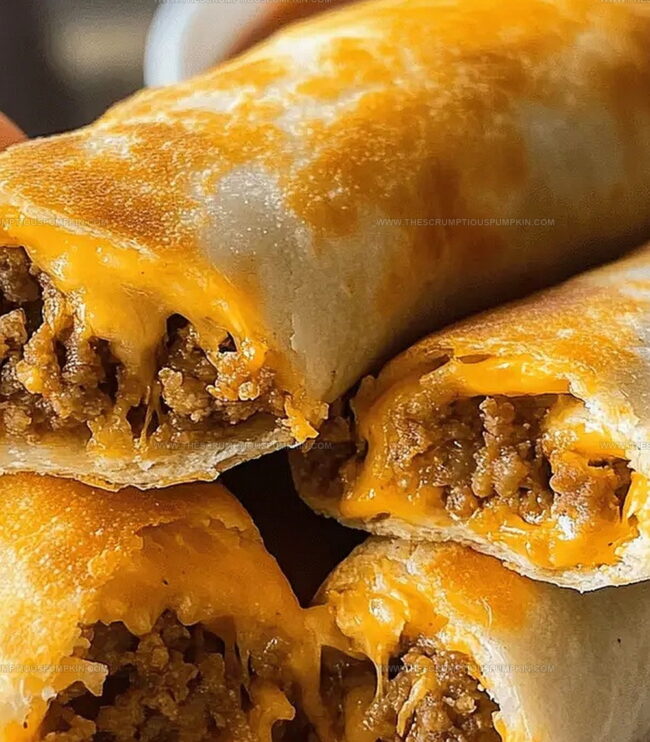
Crispy and golden cheesy taco sticks promise an explosion of flavor that’ll make your taste buds dance with excitement.
Melted cheese and seasoned meat wrap together in a crunchy exterior that screams comfort food.
Every bite brings a delightful blend of spices and gooey goodness.
Mexican-inspired snacks like these turn ordinary evenings into memorable feasts.
Quick to assemble and even faster to devour, these sticks become an instant crowd-pleaser.
Home cooks can whip up this irresistible treat in mere minutes.
You’ll want to bookmark this recipe and impress everyone at your next gathering.
Why Cheesy Taco Sticks Are Always a Hit
Ingredients for Gooey Cheesy Taco Sticks
Main Protein:Cheese Components:Dough and Seasoning:Additional Flavor Enhancers:Optional Serving Accompaniments:How to Make Cheesy Taco Sticks at Home
Step 1: Crank Up The Oven
Blast your oven to 375°F (190°C) and get it sizzling hot and ready for action.
Step 2: Brown The Beef
Toss ground beef into a skillet over medium heat. Break it apart with a spoon while cooking until it’s nicely browned. Drain away extra grease to keep things lean.
Step 3: Spice It Up
Sprinkle taco seasoning over the beef. Add a splash of water and mix everything thoroughly. Let it simmer for 2-3 minutes until the mixture thickens. Remove from heat.
Step 4: Dough Unrolling
Spread out crescent roll dough on a clean surface. Separate into 8 triangle pieces, preparing them for delicious filling.
Step 5: Load With Goodness
Top each triangle with seasoned beef and generous amounts of cheese:Make sure each triangle gets a hearty portion of filling.
Step 6: Create Tasty Rolls
Start rolling from the wide end towards the point. Pinch edges tightly to seal in all that yummy filling.
Step 7: Prep For Baking
Place rolls on parchment-lined baking sheet. Brush tops with olive oil. Sprinkle:Step 8: Bake To Perfection
Slide tray into oven and bake 12-15 minutes until golden brown and irresistible.
Step 9: Serve And Enjoy
Let cool briefly. Serve with optional toppings like:Dig in and savor every delicious bite!
Tips for Perfectly Baked Taco Sticks
Variations for Cheesy Taco Stick Fans
What to Serve with Taco Sticks
Storing Your Cheesy Taco Sticks
FAQs for Cheesy Taco Sticks
Ground beef, crescent roll dough, taco seasoning, cheddar and mozzarella cheese, olive oil, garlic powder, and onion powder are the main ingredients.
Yes, you can substitute ground beef with ground turkey, chicken, or even plant-based meat alternatives for a different flavor profile.
Pinch the edges of the crescent roll dough tightly when rolling to seal the filling completely. This helps prevent cheese and meat from spilling out during baking.
These can be prepared ahead of time and refrigerated before baking. They’re perfect for quick lunches or game day snacks that can be quickly heated up.
Print
Overflowing Taco Sticks Recipe
- Total Time: 35 minutes
- Yield: 4 1x
Description
Craving a Mexican-inspired snack? Cheesy taco sticks bring crispy tortillas wrapped around spicy seasoned beef and melted cheese, creating an irresistible handheld treat perfect for game day or casual gatherings. Grab these golden delights and enjoy a flavor-packed experience that satisfies your comfort food cravings.
Ingredients
Proteins:
- 1 pound ground beef
- 1 cup shredded cheddar cheese
- 1 cup shredded mozzarella cheese
Dough and Base:
- 1 can (8 ounces) crescent roll dough
Seasonings and Oils:
- 1 packet taco seasoning
- 1 tablespoon olive oil
- 1 teaspoon garlic powder
- 1 teaspoon onion powder
Optional Toppings:
- Sour cream
- Salsa
- Chopped green onions
Instructions
- Heat the oven to 375°F (190°C) to prepare for baking the taco sticks.
- Brown ground beef in a skillet over medium heat, breaking it into small pieces and draining excess fat.
- Stir taco seasoning into the beef, adding a small amount of water and cooking for 2-3 minutes until the mixture thickens.
- Separate crescent roll dough into individual triangles on a clean work surface.
- Layer seasoned beef and a blend of cheddar and mozzarella cheese onto each dough triangle.
- Carefully roll each triangle from the wide end to the point, sealing the edges to prevent filling from leaking.
- Arrange rolled taco sticks on a parchment-lined baking sheet, brushing the tops with olive oil and sprinkling with garlic and onion powder.
- Bake for 12-15 minutes until the exterior turns golden brown and crispy.
- Allow taco sticks to cool briefly before serving with optional garnishes like sour cream, salsa, or chopped green onions.
Notes
- Customize spice levels by adjusting the amount of taco seasoning or adding hot sauce for heat-seekers.
- Swap ground beef with ground turkey, chicken, or plant-based crumbles for a lighter protein alternative.
- Experiment with different cheese combinations like pepper jack, monterey jack, or Mexican blend for unique flavor profiles.
- Prepare filling ahead of time and store in refrigerator to streamline assembly process during busy weeknights.
- Prep Time: 15 minutes
- Cook Time: 20 minutes
- Category: Appetizer, Snacks
- Method: Baking
- Cuisine: Mexican
Nutrition
- Serving Size: 4
- Calories: 420
- Sugar: 2 g
- Sodium: 950 mg
- Fat: 25 g
- Saturated Fat: 10 g
- Unsaturated Fat: 12 g
- Trans Fat: 0 g
- Carbohydrates: 30 g
- Fiber: 1 g
- Protein: 20 g
- Cholesterol: 70 mg
Mia Thompson
Pastry Chef & Content Creator
Expertise
Education
Portland Community College – Baking and Pastry Arts Program
Specialized in artisanal bread, seasonal desserts, and sustainable baking methods.
National University of Natural Medicine – Bachelor of Science in Nutrition (BScN)
Focused on “Food as Medicine” philosophy, with core threads in nutrition.
Mia’s love affair with baking began in her grandmother’s kitchen, where sneaking spoonfuls of batter first sparked her curiosity. She refined her skills through Portland Community College’s Baking and Pastry Arts Program and her expertise at the National University of Natural Medicine, earning a B.Sc. in Nutrition.
At The Scrumptious Pumpkin, Mia reimagines classics with effortless seasonal treats, healthier twists on old favorites, and playful confections that feel like pure joy. Beyond the oven, she nurtures her urban garden, forages local ingredients around Portland, and leads hands‑on nutrition workshops for her community.