The Ultimate Pillsbury Biscuit Garlic Butter Cheese Bombs Recipe
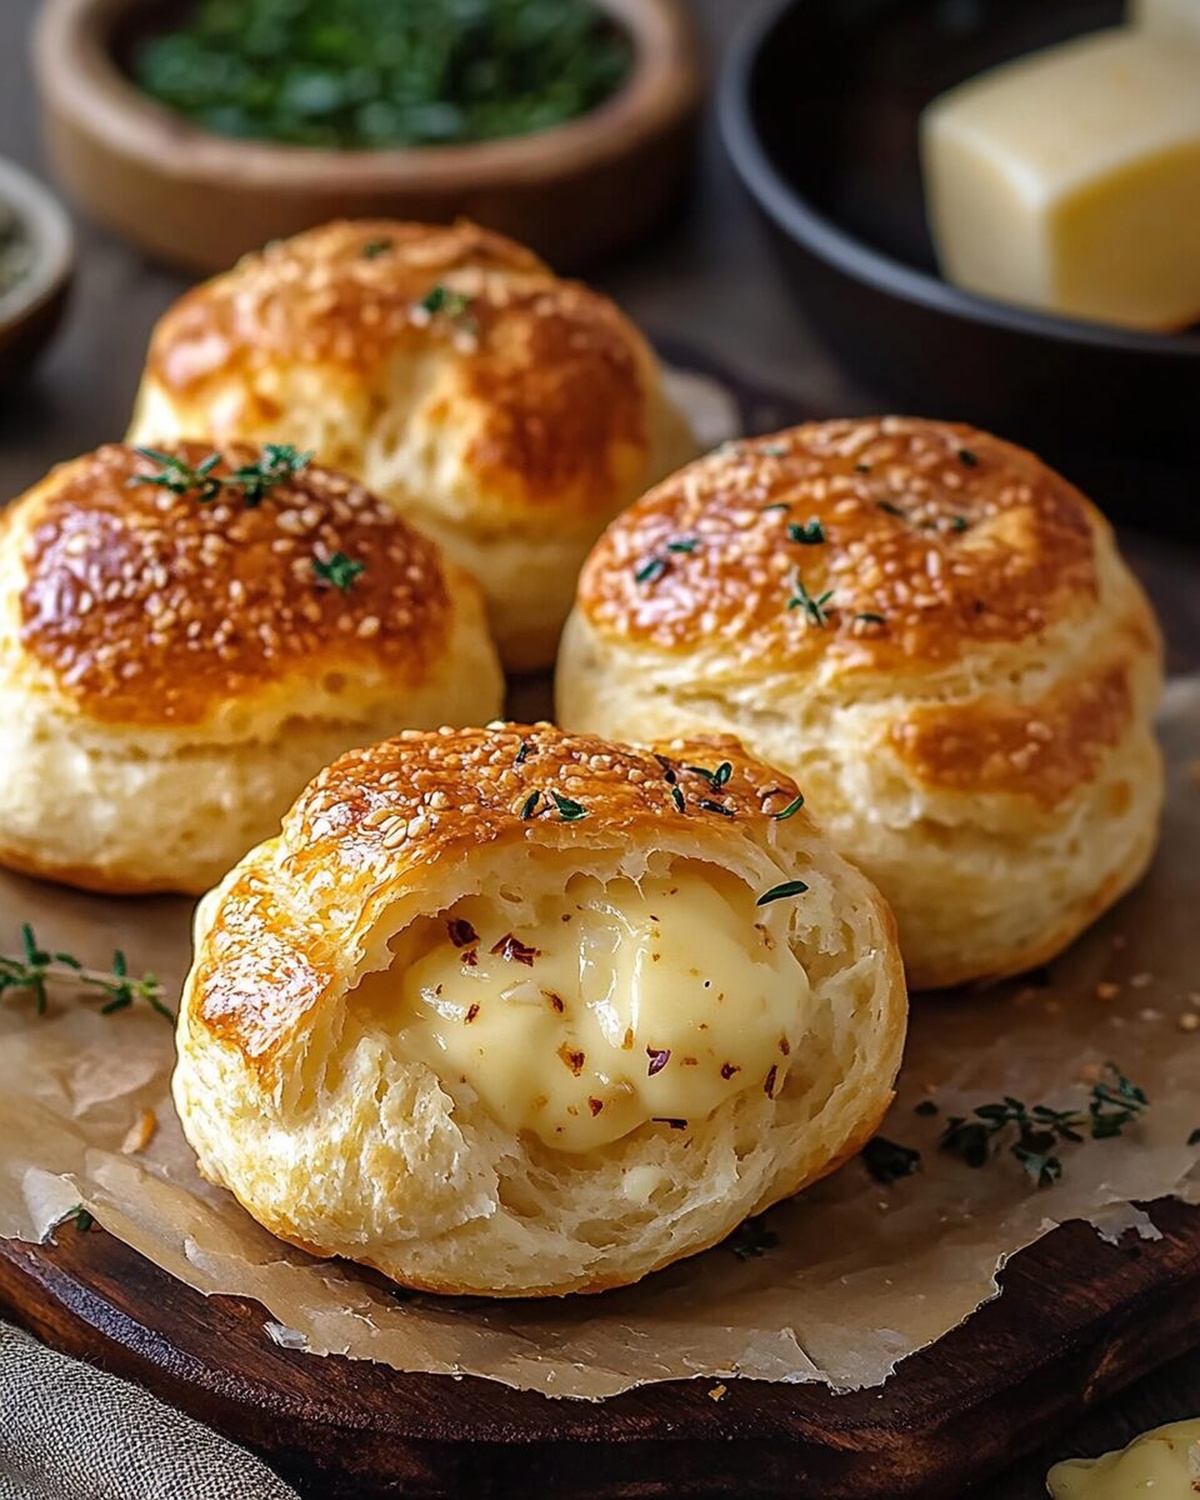
Pillsbury biscuit garlic butter cheese bombs burst with irresistible flavor and cheesy goodness.
Melted butter mingles with aromatic garlic, creating a mouthwatering experience.
Soft dough wraps around gooey cheese, promising pure comfort.
Each bite delivers a crispy exterior with a molten center that surprises and delights.
Simple ingredients combine to make magic in your kitchen.
Cheese lovers will go crazy for these addictive little parcels.
Prepare to become the hero of your next gathering with this quick and delectable treat.
Why Pillsbury Biscuit Garlic Butter Cheese Bombs Are A Cheesy Dream

What You’ll Need For Garlic Butter Cheese Bombs
Base Ingredients:Butter and Seasoning:Steps To Make Pillsbury Cheese Bombs

Step 1: Prepare the Oven
Set your oven to a toasty 375°F and prep a baking sheet with a light coating of cooking spray or a sheet of parchment paper.
Step 2: Transform the Biscuits
Gently open the Pillsbury biscuit container and softly press each biscuit flat with your fingertips, creating a smooth canvas for cheesy magic.
Step 3: Create Cheese Pockets
Center a chunk of mozzarella in each biscuit. Carefully wrap the dough around the cheese, pinching and sealing the edges completely to lock in the melty goodness.
Step 4: Arrange for Baking
Place the cheese-wrapped biscuits seam-side down on the prepared baking sheet, giving each one a little breathing room.
Step 5: Whip Up Garlic Butter Blend
In a small mixing bowl, combine:Stir these ingredients until they become a fragrant, herb-infused mixture.
Step 6: Brush with Flavor
Use a pastry brush to generously coat each biscuit with the garlic butter blend, ensuring every inch gets a delicious coating.
Step 7: Add Cheesy Topping
Sprinkle a generous layer of grated parmesan cheese over the butter-brushed biscuits, creating a crispy, cheesy crown.
Step 8: Bake to Perfection
Slide the baking sheet into the preheated oven and bake for 12-15 minutes. Watch for a beautiful golden-brown color and bubbling cheese peeking through.
Step 9: Serve and Savor
Pull these heavenly bites from the oven and let them cool for just a moment. Serve immediately while the cheese is still gooey and the exterior is crisp and golden.
Tips For Fluffy Garlic Butter Cheese Bombs
Flavorful Twists On Cheese Bombs
Perfect Pairings For Cheese Bombs
Storage Tips For Garlic Butter Cheese Bombs
FAQs For Pillsbury Biscuit Cheese Bombs
Yes, you can substitute mozzarella with cheddar, provolone, or any semi-soft cheese that melts well.
Fresh minced garlic provides the best flavor, but garlic powder works as a convenient alternative. Use about 1/2 teaspoon for the same intensity.
Absolutely! Kids love these cheesy, garlicky bites. They’re easy to eat and have a fun, melty center that children typically enjoy.
You can assemble the biscuits and refrigerate them for a few hours before baking. Just brush with garlic butter and add parmesan right before putting them in the oven.
Print
Pillsbury Biscuit Garlic Butter Cheese Bombs Recipe
- Total Time: 25 minutes
- Yield: 8 1x
Description
Pillsbury biscuit garlic butter cheese bombs explode with irresistible flavor, blending buttery biscuits, melted cheese, and aromatic garlic into one heavenly bite. Comfort and indulgence meet in this simple yet spectacular side dish you’ll crave again and again.
Ingredients
Main Ingredients:
- 1 can (16.3 ounces / 462 grams) Pillsbury Grands! biscuits
- 1 cup mozzarella cheese, cubed
- 1/2 cup parmesan cheese, grated
Flavor Enhancers:
- 1/2 cup melted butter
- 3 cloves garlic, minced
- 1 tablespoon fresh parsley, chopped
Instructions
- Prepare the oven to 375°F and create a non-stick surface using parchment paper or cooking spray on a baking sheet.
- Gently unfold each Pillsbury biscuit and softly press them into slightly flattened circles.
- Position a mozzarella cheese cube centrally on each biscuit, carefully enveloping the cheese by folding and pinching the dough edges to create a secure seal.
- Arrange the cheese-encased biscuits with sealed sides facing downward on the prepared baking sheet.
- Create a fragrant garlic butter blend by combining melted butter with finely chopped garlic and freshly chopped parsley in a mixing bowl.
- Liberally coat each biscuit with the aromatic garlic butter mixture, ensuring even coverage.
- Generously dust the top of each buttered biscuit with grated parmesan cheese for added flavor and texture.
- Transfer the baking sheet to the preheated oven and bake for 12-15 minutes until the biscuits transform into a golden-brown color and the internal cheese becomes delightfully melted.
- Remove from the oven, allow a brief cooling moment, and serve while warm to experience the ultimate cheesy, garlicky indulgence.
Notes
- Choose cold mozzarella cubes to prevent cheese leakage during baking and ensure a perfect cheese-filled center.
- Pinch biscuit edges firmly and seal completely to prevent cheese from oozing out while cooking.
- Use fresh minced garlic for more intense and vibrant flavor compared to pre-packaged garlic.
- Consider using gluten-free Pillsbury biscuits to make this recipe suitable for gluten-sensitive individuals.
- Prep Time: 10 minutes
- Cook Time: 15 minutes
- Category: Breakfast, Snacks, Appetizer
- Method: Baking
- Cuisine: American
Nutrition
- Serving Size: 8
- Calories: 300
- Sugar: 1 g
- Sodium: 700 mg
- Fat: 24 g
- Saturated Fat: 15 g
- Unsaturated Fat: 9 g
- Trans Fat: 0 g
- Carbohydrates: 20 g
- Fiber: 1 g
- Protein: 7 g
- Cholesterol: 60 mg
Mia Thompson
Pastry Chef & Content Creator
Expertise
Education
Portland Community College – Baking and Pastry Arts Program
Specialized in artisanal bread, seasonal desserts, and sustainable baking methods.
National University of Natural Medicine – Bachelor of Science in Nutrition (BScN)
Focused on “Food as Medicine” philosophy, with core threads in nutrition.
Mia’s love affair with baking began in her grandmother’s kitchen, where sneaking spoonfuls of batter first sparked her curiosity. She refined her skills through Portland Community College’s Baking and Pastry Arts Program and her expertise at the National University of Natural Medicine, earning a B.Sc. in Nutrition.
At The Scrumptious Pumpkin, Mia reimagines classics with effortless seasonal treats, healthier twists on old favorites, and playful confections that feel like pure joy. Beyond the oven, she nurtures her urban garden, forages local ingredients around Portland, and leads hands‑on nutrition workshops for her community.