
The Perfect Red Velvet Brownies Recipe: Fudgy & Dreamy Delight
Decadent red velvet brownies promise a delightful twist on classic chocolate treats that’ll make your taste buds dance with joy.
Rich cocoa and vibrant crimson hues combine in a dessert that looks as spectacular as it tastes.
Smooth cream cheese frosting adds a luxurious layer of indulgence to these fudgy squares.
Chocolate lovers will absolutely adore this inventive take on traditional brownies.
Each bite delivers a perfect balance of sweet and tangy flavors that melt seamlessly in your mouth.
These brownies shine as a stunning centerpiece for any gathering or a personal weekend treat.
You’ll want to savor every single crumb of this irresistible dessert that elevates brownies to an art form.
Why Red Velvet Brownies Are A Crowd Favorite
What’s In Red Velvet Brownies
Dry Ingredients:Wet Ingredients:Sweeteners and Mix-Ins:Frosting Ingredients:How To Make Red Velvet Brownies Easily
Step 1: Prepare Baking Setup
Preheat the oven to 335°F. Line a 9-inch square cake pan with parchment paper, ensuring complete coverage for easy removal.
Step 2: Create Butter Sugar Base
In a large mixing bowl, whisk together melted butter with granulated and light brown sugar until the mixture becomes smooth and well-blended.
Step 3: Incorporate Wet Ingredients
Add eggs, extra egg yolk, and vanilla extract.
Gently mix the ingredients, being careful not to introduce excessive air into the batter.
Step 4: Build Chocolate Foundation
Whisk in vegetable oil and cocoa powder, ensuring complete integration for a rich chocolate flavor.
Step 5: Add Vibrant Red Color
Separate a small portion of batter and mix with red gel food coloring until uniformly smooth. Reincorporate this colored mixture into the main batter, stirring until the color is completely distributed.
Step 6: Combine Dry Ingredients
Switch to a spatula and gently fold in:Mix until ingredients are just combined, avoiding overmixing.
Step 7: Enhance Flavor Profile
Stir in vinegar to introduce the classic red velvet tanginess.
Optional: Fold in white chocolate chips for extra texture and sweetness.
Step 8: Bake to Perfection
Transfer the batter to the prepared pan.
Bake for 20-25 minutes. Check doneness by inserting a toothpick – it should emerge with moist crumbs.
Step 9: Prepare Creamy Frosting
Beat softened butter and cream cheese until smooth and creamy. Gradually add powdered sugar, mixing on low speed initially.
Increase to high speed to create a fluffy texture.
Step 10: Finish and Frost
Mix vanilla extract into the frosting.
Once brownies have completely cooled, spread frosting evenly across the surface.
Step 11: Serve and Enjoy
Slice into 16 squares and serve these luxurious red velvet brownies to delight your guests.
Helpful Tricks For Red Velvet Brownies
Fun Styles For Red Velvet Brownies
What To Eat With Red Velvet Brownies
Best Way To Store Red Velvet Brownies
Answers To Red Velvet Brownies FAQs
The combination of cocoa powder, vinegar, and buttermilk (or vinegar in this case) creates the classic tangy red velvet taste that sets these brownies apart from traditional chocolate brownies.
The mix of sugars provides depth of flavor and helps create a moist, tender texture. Brown sugar adds moisture and a subtle caramel-like note to the brownies.
Use gel food coloring instead of liquid, as it provides a more vibrant red without thinning the batter. Add the coloring gradually and mix thoroughly to ensure an even, rich color throughout the brownies.
Print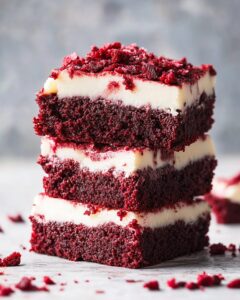
Red Velvet Brownies Recipe
- Total Time: 40 minutes
- Yield: 12 1x
Description
Indulgent red velvet brownies blend rich chocolate and velvety crimson charm into one irresistible dessert. Silky smooth layers melt perfectly, promising delectable comfort with each luxurious chocolate-kissed bite you’ll savor.
Ingredients
Main Ingredients:
- 3 large eggs
- 1 egg yolk
- 1 cup (200g) granulated sugar
- ¼ cup (55g) light brown sugar
- ¾ cup (90g) all-purpose flour
- ¼ cup (25g) Dutch-processed cocoa powder
Wet Ingredients:
- 85g (¾ stick) unsalted butter, melted
- ⅓ cup (72g) vegetable oil
- 1 teaspoon vanilla extract
- 1 tablespoon vinegar (white wine or regular white)
- ½ teaspoon red gel food coloring
Supplementary Ingredients:
- ¼ teaspoon salt
- 1 tablespoon cornstarch
- ¾ cup white chocolate chips (optional)
Cream Cheese Frosting:
- 114g (4 ounces) cream cheese, softened
- 85g (¾ stick) unsalted butter, softened
- 4 cups (480g) powdered sugar
Instructions
- Prepare the oven at 335°F and line a 9-inch square pan with parchment paper for easy removal.
- Melt butter and whisk together with granulated and brown sugars until the mixture becomes glossy and well-blended.
- Incorporate eggs, extra egg yolk, and vanilla extract, stirring gently to maintain a smooth consistency.
- Blend vegetable oil and cocoa powder into the mixture until completely integrated.
- Separate a small portion of batter and mix with red gel food coloring, then reincorporate into the main batter for an even crimson tone.
- Transition to a spatula and delicately fold in flour, cornstarch, and salt, ensuring minimal mixing to preserve the brownie’s tender texture.
- Add vinegar to enhance the signature red velvet tanginess, and optionally fold in white chocolate chips for extra richness.
- Transfer the batter to the prepared pan, spreading evenly, and bake for 20-25 minutes until a toothpick reveals moist crumbs.
- Allow brownies to cool completely before preparing the frosting.
- Cream together softened butter and cream cheese until silky and uniform in texture.
- Gradually introduce powdered sugar at low speed, then whip on high until the frosting becomes light and fluffy.
- Stir in vanilla extract and spread the frosting uniformly across the cooled brownies.
- Slice into 16 equal squares and serve at room temperature.
Notes
- Make sure to use gel food coloring for vibrant red color without altering the batter’s consistency.
- Sift dry ingredients to prevent lumps and ensure smooth, even texture in brownies.
- Avoid overmixing batter to keep brownies tender and prevent tough, dense results.
- Experiment with different chocolate chips like dark or milk chocolate for unique flavor variations.
- Allow brownies to cool completely before frosting to prevent melting and maintain clean, crisp edges.
- Store frosted brownies in refrigerator for up to 5 days in an airtight container for maximum freshness.
- For gluten-free option, substitute all-purpose flour with gluten-free blend and add 1/4 teaspoon xanthan gum.
- Create cream cheese frosting swirls using piping bag for elegant, professional-looking presentation.
- Prep Time: 15 minutes
- Cook Time: 25 minutes
- Category: Desserts, Snacks
- Method: Baking
- Cuisine: American
Nutrition
- Serving Size: 12
- Calories: 290
- Sugar: 30g
- Sodium: 150mg
- Fat: 15g
- Saturated Fat: 9g
- Unsaturated Fat: 4g
- Trans Fat: 0g
- Carbohydrates: 38g
- Fiber: 0.5g
- Protein: 2g
- Cholesterol: 55mg
Mia Thompson
Pastry Chef & Content Creator
Expertise
Education
Portland Community College – Baking and Pastry Arts Program
Specialized in artisanal bread, seasonal desserts, and sustainable baking methods.
National University of Natural Medicine – Bachelor of Science in Nutrition (BScN)
Focused on “Food as Medicine” philosophy, with core threads in nutrition.
Mia’s love affair with baking began in her grandmother’s kitchen, where sneaking spoonfuls of batter first sparked her curiosity. She refined her skills through Portland Community College’s Baking and Pastry Arts Program and her expertise at the National University of Natural Medicine, earning a B.Sc. in Nutrition.
At The Scrumptious Pumpkin, Mia reimagines classics with effortless seasonal treats, healthier twists on old favorites, and playful confections that feel like pure joy. Beyond the oven, she nurtures her urban garden, forages local ingredients around Portland, and leads hands‑on nutrition workshops for her community.