
The Best Chicken Bacon Ranch Sliders Recipe You’ll Ever Try
Crafting delectable chicken bacon ranch sliders can turn an ordinary meal into a crowd-pleasing sensation.
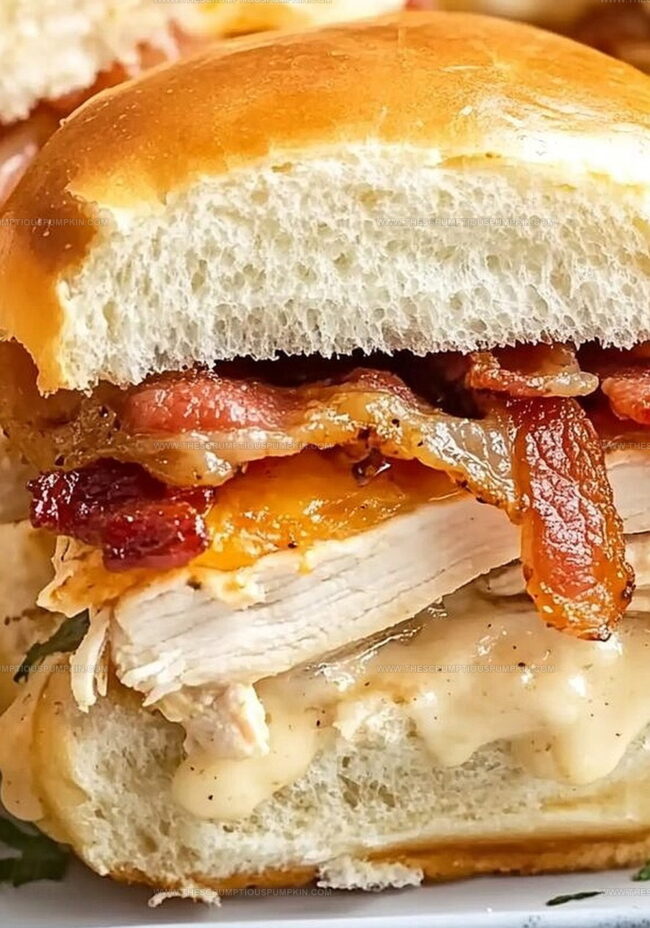
Savory layers of juicy chicken, crispy bacon, and creamy ranch create an irresistible combination that sparks instant hunger.
Compact and convenient, these mini sandwiches pack massive flavor in every single bite.
Perfectly sized for gatherings or game day snacking, they guarantee smiles around the table.
Each slider promises a delightful blend of textures and tastes that dance across your palate.
Crisp edges, melted cheese, and zesty ranch sauce make these little sandwiches impossible to resist.
You won’t be able to stop at just one of these mouthwatering mini delights.
Why These Sliders Are Always a Hit

Ingredients That Make Ranch, Bacon & Chicken Sing
Main Protein and Protein Enhancers:Bread Base:Flavor Enhancers:Binding and Topping Ingredients:How to Build Sliders with Flavor in Every Layer
Step 1: Prepare Baking Dish
Grab a 13×9-inch baking dish and grease it lightly to prevent sticking. Slice the rolls horizontally without separating them, keeping them connected as one unit.
Step 2: Mix Chicken Filling
In a large mixing bowl, combine shredded chicken with these ingredients:Stir everything until the mixture looks evenly blended and coated.
Step 3: Layer the Base
Spread the chicken-bacon mixture across the bottom half of the rolls in the prepared baking dish.
Arrange cheese slices on top, overlapping as needed to create a complete coverage.
Step 4: Top and Season
Place the top half of the rolls over the cheese layer.
In a separate small bowl, whisk together:Brush this flavorful mixture generously over the roll tops. Sprinkle Parmesan cheese evenly across the surface.
Step 5: Bake and Melt
Cover the baking dish with foil and slide into a preheated oven at 350°F. Bake for 25-27 minutes until cheese melts completely.
Remove the foil and continue baking for an additional 5-7 minutes to achieve golden brown roll tops.
Step 6: Serve and Enjoy
Remove from oven, let cool slightly, then slice into individual sliders.
Serve warm and watch everyone dig in with excitement!
Slider Tips to Keep It Juicy and Cheesy
Tasty Slider Combos to Try Next
What Goes Great with Chicken Ranch Sliders
Keep These Sliders Fresh and Tasty for Later
FAQs for Slider Lovers Everywhere
Yes, rotisserie chicken works perfectly and saves time. Just shred the meat and mix with other ingredients as directed.
Ranch adds great flavor, but you can substitute with sour cream or mayo mixed with herbs if needed.
Use fresh rolls and don’t overmix the chicken filling. Brush butter mixture on top helps create a crispy exterior.
Yes, you can assemble the sliders up to a day in advance and refrigerate. Just add 5-10 minutes to baking time when cooking from cold.
Print
Slider-Style Chicken Bacon Ranch Sliders Recipe
- Total Time: 42–44 minutes
- Yield: 12 1x
Description
Mouthwatering chicken bacon ranch sliders combine classic comfort with irresistible flavor combinations. Crispy bacon, tender chicken, and creamy ranch nestled in mini rolls promise a crowd-pleasing bite you’ll crave at every gathering.
Ingredients
Proteins:
- 2 cups cooked chicken (shredded)
- 8 slices cooked bacon (crumbled)
- 6 slices Colby-Monterey Jack cheese
- 2 tablespoons grated Parmesan cheese
Bread:
- 1 pack Hawaiian sweet rolls (12 rolls)
Seasonings and Sauces:
- 1/2 cup ranch salad dressing
- 1/4 cup unsalted butter (melted)
- 1 tablespoon chives (fresh or dried, finely chopped)
- 1/2 teaspoon garlic powder
Instructions
- Carefully slice the entire roll package horizontally without separating individual rolls, maintaining their connected structure.
- Position the bottom half of the rolls in a lightly greased 13×9-inch baking dish, ensuring a uniform base.
- Combine shredded chicken, crispy bacon bits, and creamy ranch dressing in a mixing bowl, stirring until ingredients are thoroughly integrated.
- Evenly distribute the chicken-bacon mixture across the roll bottoms, creating a consistent layer of flavor.
- Arrange cheese slices over the chicken mixture, slightly overlapping to ensure complete coverage.
- Gently place the top half of the rolls over the cheese layer, creating a complete slider assembly.
- Whisk melted butter with finely chopped chives and garlic powder to create a flavorful spread.
- Brush the butter mixture generously over the roll tops, ensuring complete and even coverage.
- Sprinkle Parmesan cheese across the surface for an additional layer of richness.
- Cover the baking dish with aluminum foil and bake at 350°F for 25 minutes.
- Remove foil and continue baking for an additional 5-7 minutes until roll tops turn golden brown and cheese becomes perfectly melted.
- Allow sliders to rest for a few minutes before serving to set and enhance flavors.
Notes
- Shred chicken while it’s warm for easier and quicker mixing, preventing tough, stringy textures.
- Use rotisserie chicken as a time-saving hack that delivers extra flavor and tender meat.
- Customize dietary needs by swapping regular ranch for low-fat or dairy-free versions, and use gluten-free rolls for those with sensitivities.
- Prepare ingredients ahead of time and assemble sliders just before baking to maintain optimal bread texture and prevent sogginess.
- Prep Time: 10 minutes
- Cook Time: 32–34 minutes
- Category: Lunch, Dinner, Appetizer, Snacks
- Method: Baking
- Cuisine: American
Nutrition
- Serving Size: 12
- Calories: 330
- Sugar: 3g
- Sodium: 800mg
- Fat: 21g
- Saturated Fat: 10g
- Unsaturated Fat: 9g
- Trans Fat: 0g
- Carbohydrates: 24g
- Fiber: 1g
- Protein: 14g
- Cholesterol: 60mg
Mia Thompson
Pastry Chef & Content Creator
Expertise
Education
Portland Community College – Baking and Pastry Arts Program
Specialized in artisanal bread, seasonal desserts, and sustainable baking methods.
National University of Natural Medicine – Bachelor of Science in Nutrition (BScN)
Focused on “Food as Medicine” philosophy, with core threads in nutrition.
Mia’s love affair with baking began in her grandmother’s kitchen, where sneaking spoonfuls of batter first sparked her curiosity. She refined her skills through Portland Community College’s Baking and Pastry Arts Program and her expertise at the National University of Natural Medicine, earning a B.Sc. in Nutrition.
At The Scrumptious Pumpkin, Mia reimagines classics with effortless seasonal treats, healthier twists on old favorites, and playful confections that feel like pure joy. Beyond the oven, she nurtures her urban garden, forages local ingredients around Portland, and leads hands‑on nutrition workshops for her community.