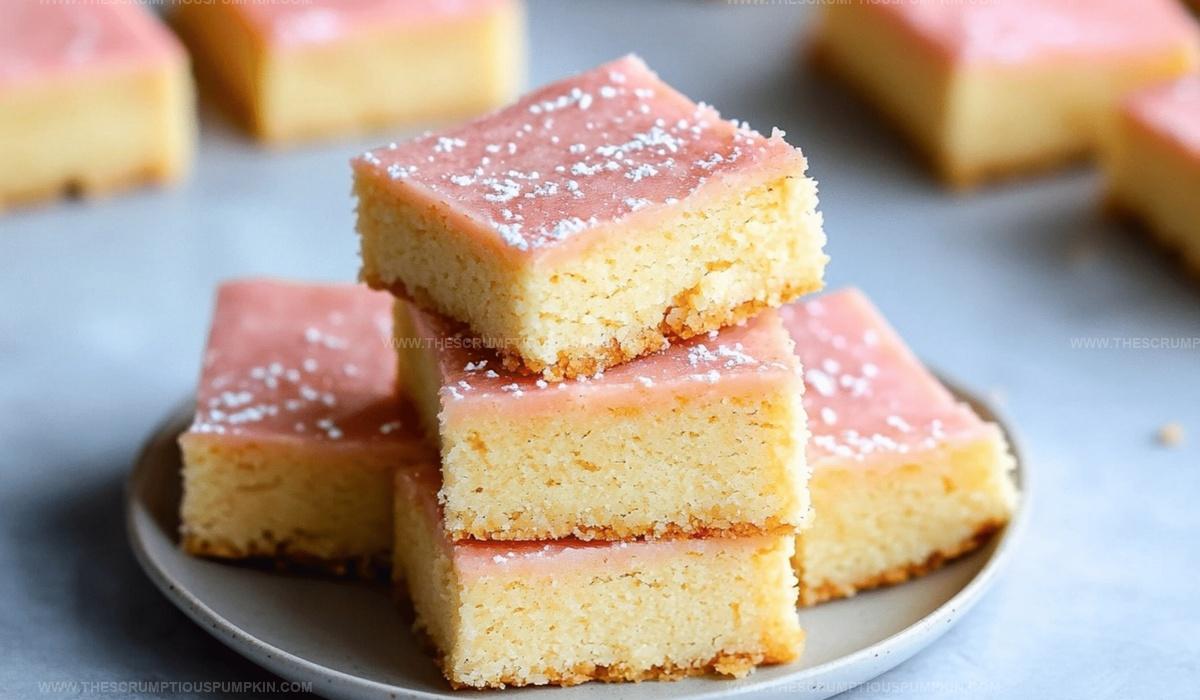
The Ultimate Sugar Cookie Bars Recipe: Soft & Sweet Bliss
Sweet, buttery sugar cookie bars burst with nostalgic charm that reminds me of childhood afternoons in grandma’s cozy kitchen.
Memories of soft, pillowy squares dusted with sparkling sugar dance through my mind.
My family always requests these delightful treats during holiday gatherings.
Classic ingredients combine effortlessly to create a dessert everyone adores.
Mixing the dough takes mere minutes, making these bars perfect for spontaneous baking adventures.
Crisp edges and tender centers promise pure comfort in every delectable bite.
You’ll want to savor each morsel and share the joy with loved ones.
Why Sugar Cookie Bars Are Everyone’s Favorite
Sugar Cookie Bars Ingredient Must-Haves
Base Ingredients:Leavening and Seasoning:Finishing Ingredients:How To Whip Up Sugar Cookie Bars

Step 1: Warm Up The Oven
Crank your oven to a toasty 350°F and grab your 9×13-inch baking pan. Line it with parchment paper, letting the edges hang over slightly so you can easily lift out your delicious treats later.
Step 2: Whip Up The Base
In a large mixing bowl, blend softened butter and sugar until the mixture looks super fluffy and light. Beat it well for about 3-4 minutes to get that perfect texture.
Step 3: Add Moisture And Flavor
Drop in eggs one by one, mixing thoroughly after each addition. Pour in vanilla extract and blend everything until it’s beautifully combined and smooth.
Step 4: Create The Dry Mix
In a separate bowl, whisk together:Gently fold these dry ingredients into your wet mixture until a soft, uniform dough forms.
Step 5: Spread The Love
Transfer cookie dough into your prepared pan. Use a spatula to spread the dough evenly, creating a smooth and consistent layer.
Step 6: Bake To Perfection
Pop the pan into the oven and bake for 18-22 minutes. You’ll know they’re ready when the edges turn a gorgeous golden brown and the center looks set but still slightly soft.
Step 7: Cool Down
Pull the pan out of the oven and let the bars cool completely in the pan. This should take around 45 minutes.
Step 8: Craft The Glaze
Whisk powdered sugar and milk together until you get a silky smooth glaze. Add food coloring if you want to make it extra fun.
Step 9: Lift And Transfer
Use the parchment paper edges to lift the cooled cookie bars out of the pan and onto a cutting board.
Step 10: Decorate With Flair
Drizzle the glaze over the bars and immediately sprinkle with decorative sprinkles for a pop of color and texture.
Step 11: Slice And Enjoy
Cut into squares and serve at room temperature. Get ready for some serious yum!
Sugar Cookie Bars Tips That Help
Ways To Change Up Sugar Cookie Bars
Tasty Pairings For Sugar Cookie Bars
Sugar Cookie Bars Storage Tips You Need
Sugar Cookie Bars FAQ That Helps
Yes, but reduce or omit the added salt in the recipe to prevent the bars from becoming too salty.
Look for golden brown edges and a center that’s set but still slightly soft. A toothpick inserted should come out with a few moist crumbs.
Definitely! Prepare the bars up to 3 days in advance and store them in an airtight container at room temperature. The glaze can be added just before serving.
Use aluminum foil greased with butter or cooking spray, or directly grease the baking pan. The parchment paper just helps with easy removal.
Print
Sugar Cookie Bars Recipe
- Total Time: 1 hour 22 minutes
- Yield: 12 1x
Description
Sweet and buttery sugar cookie bars promise pure comfort with their melt-in-your-mouth texture. Homemade goodness fills your kitchen with nostalgic warmth, inviting you to savor each delightful, crumbly bite.
Ingredients
Main Ingredients:
- 2 cups all-purpose flour
- 1 cup unsalted butter
- 1 cup granulated sugar
Wet Ingredients:
- 2 large eggs
- 1 tsp vanilla extract
Decorating/Finishing Ingredients:
- 1/2 cup powdered sugar
- 2 tbsp milk
- 1/4 tsp salt
- 1/2 tsp baking powder
- Food coloring (optional)
- Sprinkles (optional)
Instructions
- Preheat the oven to 350°F and line a 9×13-inch baking pan with parchment paper, allowing slight overhang for easy removal.
- Cream softened butter and granulated sugar in a large mixing bowl until light and fluffy, approximately 3-4 minutes.
- Incorporate eggs one at a time, mixing thoroughly after each addition, then blend in vanilla extract until fully combined.
- Whisk together flour, salt, and baking powder in a separate bowl, then gradually fold dry ingredients into the wet mixture until a smooth dough forms.
- Transfer the cookie dough into the prepared baking pan, using a spatula to spread evenly and create a uniform layer.
- Bake for 18-22 minutes, or until edges turn golden brown and the center appears set but slightly soft.
- Remove from oven and allow to cool completely in the pan for about 45 minutes.
- For the glaze, whisk powdered sugar and milk until smooth, adding food coloring if desired.
- Lift the cooled cookie bars out using parchment paper edges and transfer to a cutting board.
- Drizzle glaze over the bars and immediately sprinkle with decorative sprinkles if using.
- Cut into squares and serve at room temperature.
Notes
- Chill the dough for 30 minutes before spreading in the pan to prevent spreading and maintain crisp edges during baking.
- Swap all-purpose flour with gluten-free blend for celiac-friendly version, ensuring texture remains soft and tender.
- Use gel food coloring for vibrant frosting without thinning the glaze, creating stunning visual appeal with minimal effort.
- Line pan with extra parchment paper overhang for effortless bar removal and clean, precise cutting without crumbling.
- Prep Time: 15 minutes
- Cook Time: 22 minutes
- Category: Desserts, Snacks
- Method: Baking
- Cuisine: American
Nutrition
- Serving Size: 12
- Calories: 200
- Sugar: 12 g
- Sodium: 100 mg
- Fat: 10 g
- Saturated Fat: 6 g
- Unsaturated Fat: 4 g
- Trans Fat: 0 g
- Carbohydrates: 28 g
- Fiber: 0 g
- Protein: 2 g
- Cholesterol: 40 mg
Mia Thompson
Pastry Chef & Content Creator
Expertise
Education
Portland Community College – Baking and Pastry Arts Program
Specialized in artisanal bread, seasonal desserts, and sustainable baking methods.
National University of Natural Medicine – Bachelor of Science in Nutrition (BScN)
Focused on “Food as Medicine” philosophy, with core threads in nutrition.
Mia’s love affair with baking began in her grandmother’s kitchen, where sneaking spoonfuls of batter first sparked her curiosity. She refined her skills through Portland Community College’s Baking and Pastry Arts Program and her expertise at the National University of Natural Medicine, earning a B.Sc. in Nutrition.
At The Scrumptious Pumpkin, Mia reimagines classics with effortless seasonal treats, healthier twists on old favorites, and playful confections that feel like pure joy. Beyond the oven, she nurtures her urban garden, forages local ingredients around Portland, and leads hands‑on nutrition workshops for her community.