
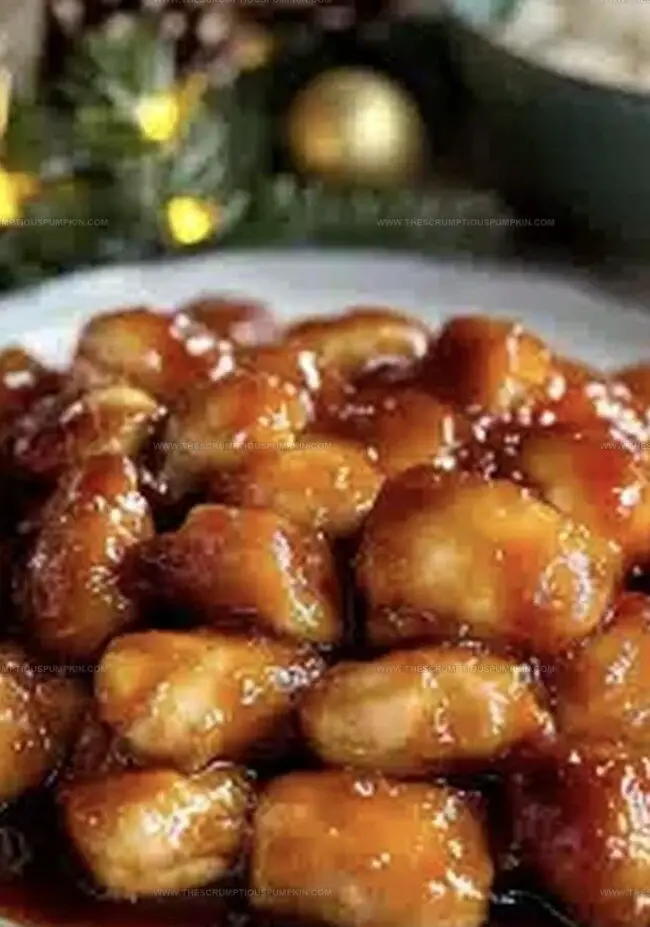
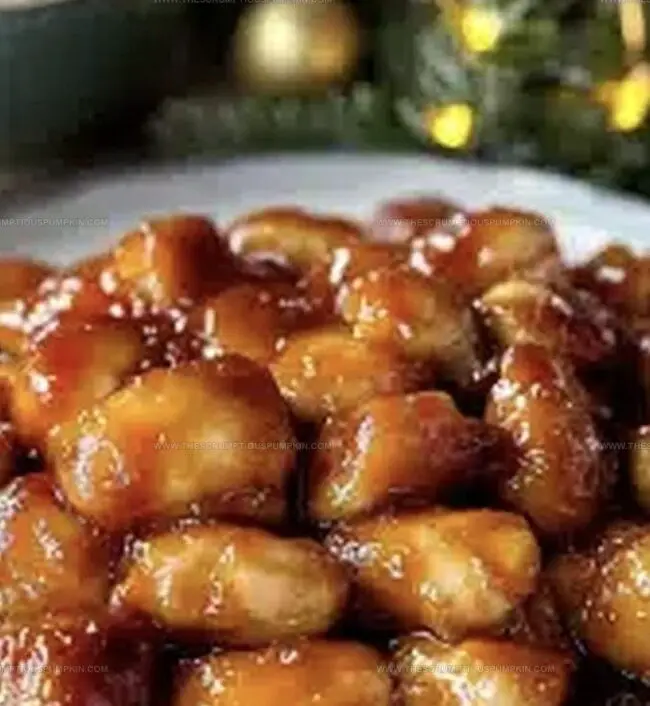
Crispy Sweet And Sour Chicken Recipe That Dazzles Every Time
Chicken with a delightful sweet and sour twist creates a mouthwatering melody of flavors that dance across your palate.
Crispy golden pieces nestle beneath a glossy, vibrant sauce that promises culinary excitement.
Zesty ingredients blend harmoniously, turning an ordinary meal into something extraordinary.
Home cooks can easily master this classic dish with minimal preparation time.
Tangy pineapple and bright bell peppers add unexpected complexity to each bite.
Weeknight dinners transform into memorable experiences when you serve this crowd-pleasing recipe.
Dive in and let your taste buds explore a perfect balance of sweet, savory, and tangy sensations.
Why Sweet and Sour Chicken Is Packed With Flavor
What You’ll Need For Sweet and Sour Chicken
For the Main Protein:For the Coating:For the Sauce Components:For the Aromatics and Vegetables:For the Fruit Component:For the Garnish:For the Cooking Oils:Simple Steps To Cook Sweet and Sour Chicken
Step 1: Prepare Chicken Cubes
Slice chicken breast into uniform bite-sized pieces to ensure even cooking throughout.
Step 2: Create Crispy Coating
Generously dust chicken pieces with cornstarch, creating a light protective layer that will transform into a delightful crispy exterior when fried.
Step 3: Heat Cooking Oil
Warm oil in a large skillet or wok until it reaches the perfect frying temperature of 375°F.
Step 4: Fry Chicken Pieces
Carefully lower chicken chunks into hot oil, working in batches to maintain optimal oil temperature. Rotate pieces to achieve a gorgeous golden-brown color, cooking for 3-4 minutes per batch.
Step 5: Drain Excess Oil
Transfer fried chicken to a paper towel-lined plate, allowing excess oil to drip away while maintaining the crispy texture.
Step 6: Craft Vibrant Sauce
Whisk together sauce ingredients:Blend until smooth and well-combined.
Step 7: Sauté Vegetables
In the same skillet, cook vegetables over medium-high heat:Sauté until slightly softened, about 2-3 minutes.
Step 8: Add Aromatic Elements
Quickly stir in:Mix rapidly to prevent burning and release intense flavors.
Step 9: Simmer Sauce
Pour prepared sauce into skillet, allowing it to bubble and slightly thicken for 1-2 minutes.
Step 10: Combine Chicken and Sauce
Gently reintroduce crispy chicken pieces into the sauce, tossing to ensure complete and even coating.
Step 11: Finish with Garnish
Sprinkle:Add a final touch of color and texture.
Step 12: Serve and Enjoy
Plate over steamed rice, presenting a mouthwatering dish that balances crispy chicken with a tantalizing sweet-sour sauce.
Tips To Make Sweet and Sour Chicken Even Better
Ways To Mix Up Sweet and Sour Chicken
Great Sides For Sweet and Sour Chicken
How To Store Sweet and Sour Chicken
Sweet and Sour Chicken FAQs
Cornstarch creates a protective layer that helps seal moisture inside the chicken while producing a crispy, golden exterior during frying. This technique ensures the chicken remains juicy and develops a delightful crunch.
Rice vinegar provides a mild, slightly sweet flavor ideal for this recipe. However, you can substitute with apple cider vinegar or white wine vinegar for similar tangy results. Just keep the measurement consistent.
Use a digital thermometer to check that the oil reaches 375°F. If you don’t have one, drop a small piece of bread into the oil – if it sizzles and turns golden within 10 seconds, the oil is ready for frying.
Print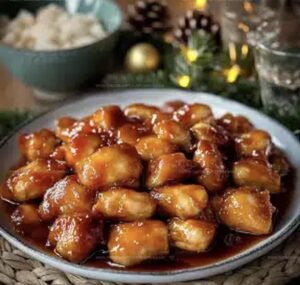
Tangy Sweet And Sour Chicken Recipe
- Total Time: 35 minutes
- Yield: 4 1x
Description
Culinary magic unfolds with sweet and sour chicken, a classic Chinese-American dish that dances between tangy and sugary flavors. Crispy chicken pieces glazed in a perfect sauce promise a delightful meal you’ll savor with every delectable bite.
Ingredients
Protein:
- 2 lbs (907 g) chicken breast
- 1/2 cup (120 ml) cornstarch
Sauce Ingredients:
- 1/2 cup (120 ml) ketchup
- 1/4 cup (60 ml) rice vinegar
- 1/4 cup (60 ml) soy sauce
- 1/3 cup (80 ml) brown sugar
- 1 tbsp (15 ml) sesame oil
Vegetables and Aromatics:
- 1 bell pepper, chopped
- 1 onion, chopped
- 2 cloves garlic, minced
- 1/4 cup (40 g) pineapple chunks
Garnish:
- 2 tbsp (8 g) green onions, chopped
- 1 tbsp (15 ml) sesame seeds
Instructions
- Cut chicken breast into bite-sized cubes, ensuring uniform pieces for consistent cooking.
- Coat chicken thoroughly with cornstarch, creating a light, crispy exterior that will help seal in moisture during frying.
- Heat oil in a large skillet or wok to 375°F, preparing for deep golden frying of chicken pieces.
- Carefully fry chicken chunks in batches, rotating to achieve an even, crisp golden-brown coating, approximately 3-4 minutes per batch.
- Remove fried chicken and drain on paper towels to eliminate excess oil, keeping pieces crisp and not greasy.
- In a separate bowl, whisk together ketchup, rice vinegar, soy sauce, brown sugar, and sesame oil to create a vibrant, tangy sweet and sour sauce.
- In the same skillet, sauté chopped onions and bell peppers over medium-high heat until slightly softened, about 2-3 minutes.
- Add minced garlic and pineapple chunks, stirring quickly to prevent burning and release aromatic flavors.
- Pour prepared sauce into the skillet, allowing it to simmer and slightly thicken for 1-2 minutes.
- Reintroduce crispy chicken pieces into the sauce, gently tossing to ensure complete and even coating.
- Garnish with chopped green onions and sprinkle sesame seeds on top for added texture and visual appeal.
- Serve immediately over steamed rice, enjoying the perfect balance of crispy chicken and vibrant sweet-sour sauce.
Notes
- Prep chicken uniformly to ensure each piece cooks evenly and maintains consistent texture during frying.
- Use paper towels to absorb excess oil, preventing greasy chicken and maintaining that desirable crispy exterior.
- Adjust sauce sweetness by balancing vinegar and sugar quantities to suit personal taste preferences or dietary needs.
- For gluten-free version, substitute regular soy sauce with tamari and ensure cornstarch is certified gluten-free.
- Prep Time: 15 minutes
- Cook Time: 20 minutes
- Category: Lunch, Dinner
- Method: Frying
- Cuisine: Chinese
Nutrition
- Serving Size: 4
- Calories: 420
- Sugar: 14 g
- Sodium: 800 mg
- Fat: 10 g
- Saturated Fat: 1.5 g
- Unsaturated Fat: 7 g
- Trans Fat: 0 g
- Carbohydrates: 55 g
- Fiber: 2 g
- Protein: 28 g
- Cholesterol: 80 mg
Mia Thompson
Pastry Chef & Content Creator
Expertise
Education
Portland Community College – Baking and Pastry Arts Program
Specialized in artisanal bread, seasonal desserts, and sustainable baking methods.
National University of Natural Medicine – Bachelor of Science in Nutrition (BScN)
Focused on “Food as Medicine” philosophy, with core threads in nutrition.
Mia’s love affair with baking began in her grandmother’s kitchen, where sneaking spoonfuls of batter first sparked her curiosity. She refined her skills through Portland Community College’s Baking and Pastry Arts Program and her expertise at the National University of Natural Medicine, earning a B.Sc. in Nutrition.
At The Scrumptious Pumpkin, Mia reimagines classics with effortless seasonal treats, healthier twists on old favorites, and playful confections that feel like pure joy. Beyond the oven, she nurtures her urban garden, forages local ingredients around Portland, and leads hands‑on nutrition workshops for her community.